Most of us have had a reason to countdown the days until something whether it be Christmas or our birthday. Right? I thought countdowns were only a childhood thing, but the older I get, the more I find myself counting down. Countdown to Christmas, countdown until a fun vacation, xxx days until the baby is due, xxx days until hubs returns home from a deployment etc etc. Countdowns seem to be a major part of my life these days! Even more so now that I have tots. I found this “days until” chalkboard and made it about a year ago as a gift. There have been many times when I have told myself that I need to make another one. So, I finally did! With my husbands YEAR deployment quickly approaching I thought it would be perfect. I know our daughter will love erasing and writing a new number on the chalk part everyday. And I love that I have another chalkboard in my house. They’re so useful…and cute!
What I love about this countdown chalkboard sign is that it’s inexpensive and you can customize it. You can paint the main board any color you want. The original one I made over a year ago was white. This time I made it grey. If you already have a Silhouette machine you can cut out the letters that way or you can order from Back 40 Life for only $5. You can also order regular vinyl decals here. If you choose the vinyl letters, just make sure you line them up straight on the board.
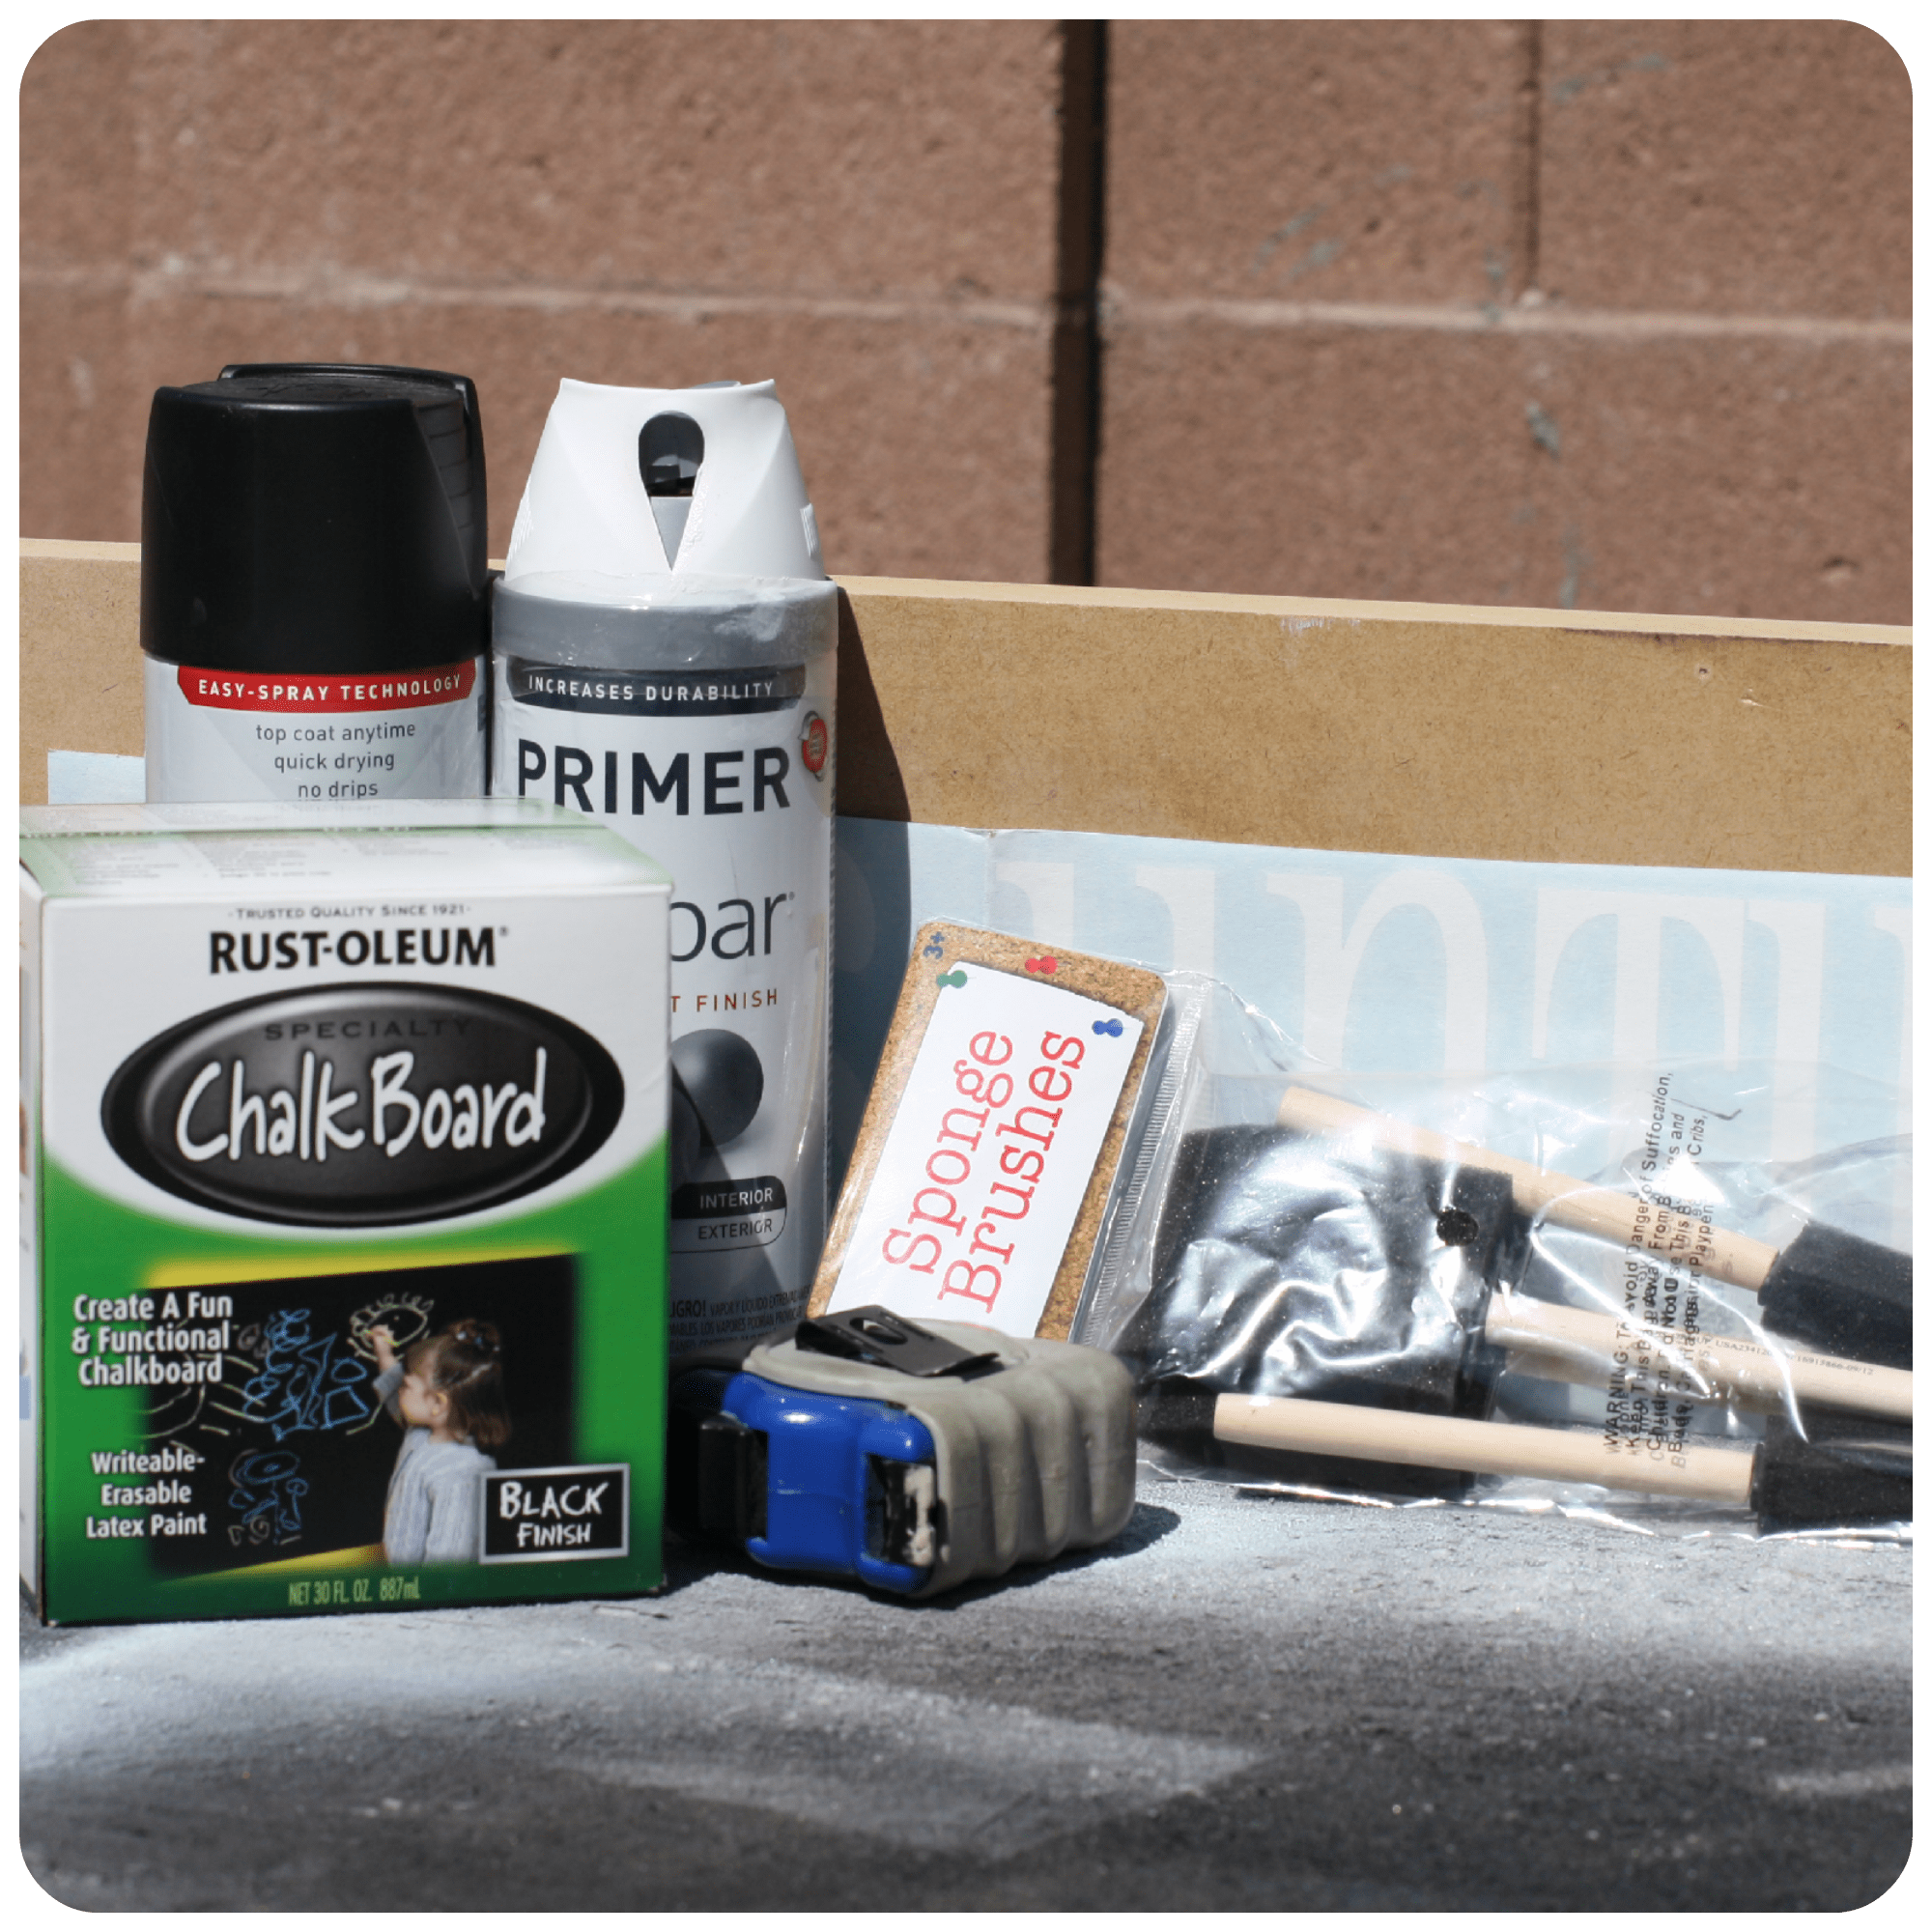
For your Countdown “Days Until” Sign you will need:
- 1in x 6in x 30in pine board. Home Depot/Lowes have some precut in almost this exact size.
- White primer
- Black spray paint
- Black paint
- Black chalkboard paint
- Foam paintbrushes
- Days Until vinyl letters (Back 40 Life, Silouette machine, or vinyl letters)
- Electric sander with rough grit sand paper
- Two sawtooth hangers if you want to hang your sign
- Chalk pens

Now that you have all your supplies lets get to work.
- Prime or paint your entire board whatever color you’d like. You don’t have to paint the back; just the sides and top. I thought I’d prime mine white, but at the last minute decided to just paint grey with some extra paint we had.
- Once the paint has dried, paint the edges black.
- Before centering your vinyl letters, run a credit card over the letters to make sure they’re stuck to the paper. Now peel your backing paper and center the words. Tip: My letters would not stick to my backing paper so I microwaved them for 3 seconds and it worked beautifully!
- Stick the letters to the white side of the board. Once you have placed the letters, run the credit card across the letters again to make sure the letters are really stuck. This will ensure that paint won’t seep underneath.
- Spray black paint over the entire area of the Days Until letters. It’s ok if you get the sides because you’re going to paint it with chalk paint. Let Dry.
- To the left and right side of the “Days Until” words, paint two coats of chalkboard paint rectangles. Dry.
- When the sign is completely dry, peel the vinyl letters. You’ll see the pretty color you painted the board underneath. What a sweet surprise! And the words look like you painted them on. Voila! If any paint snuck under the vinyl, just use a small brush or paint pen to touch up those spots.
Using your sandpaper you can rough up the edges a little bit. You can leave as is though. I will have mine just resting on a shelf, but if you’d rather hang your countdown sign, just attach a couple saw tooth hangers to the back.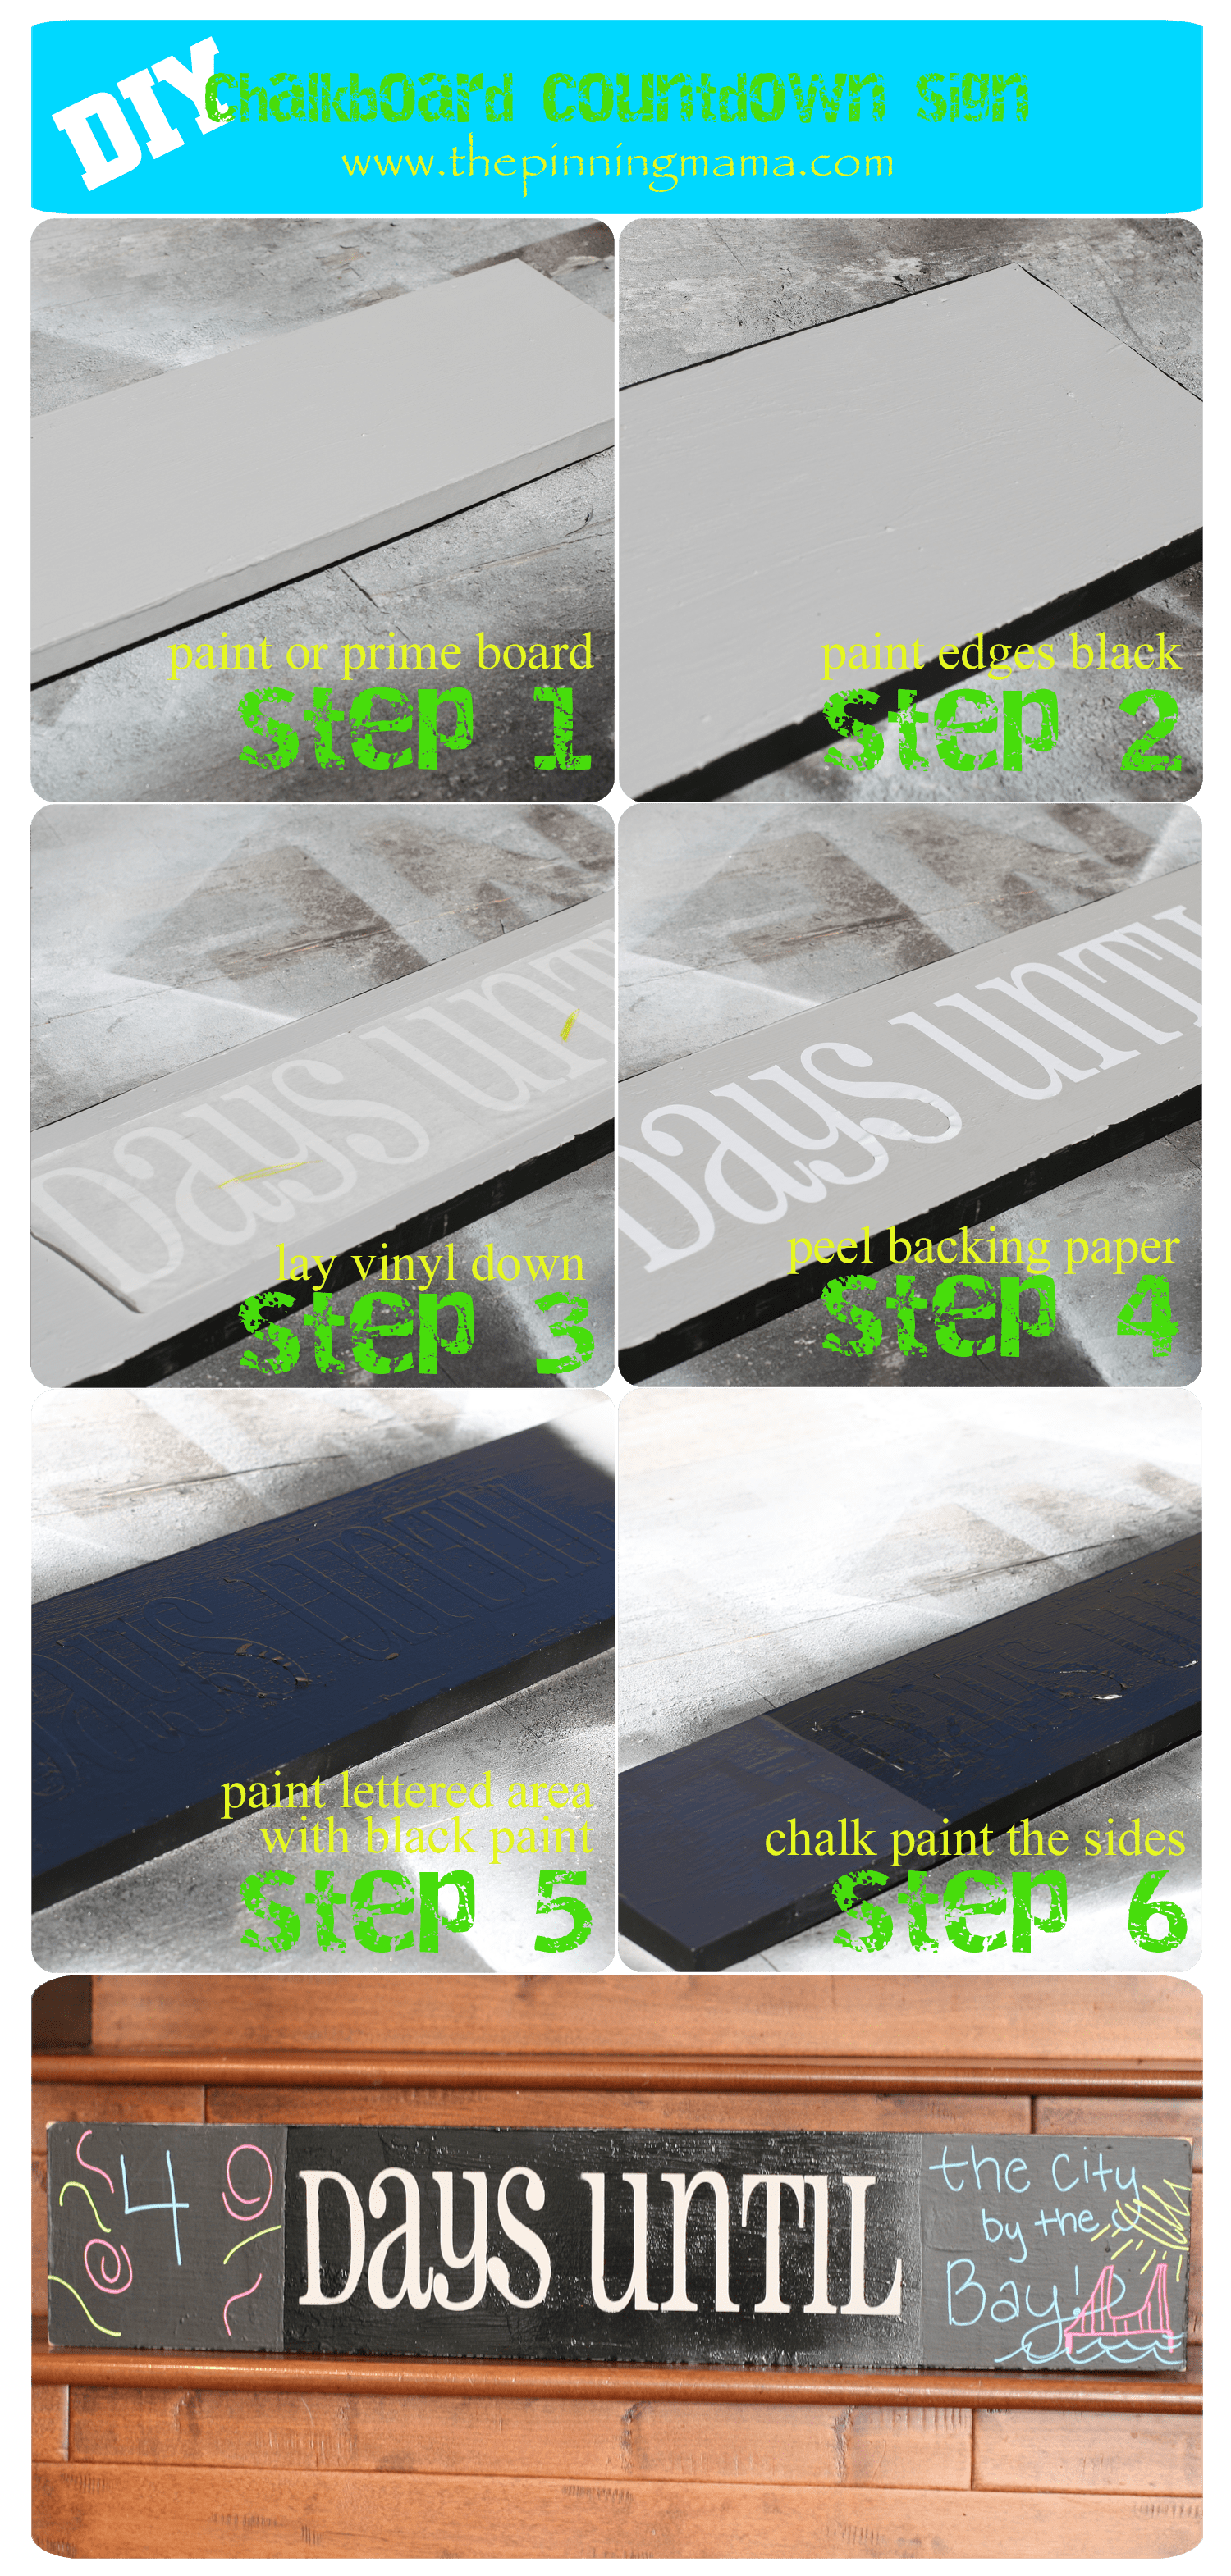
Wasn’t that easy?
Here are a couple other examples of some vinyl crafts I have done. I did not use a silhouette machine with these! I just bought vinyl lettering like these found on amazon. You place the letters onto your canvas or whatever material you choose to use, then paint over the top. In the first one I just did all yellow. All I did was lay my letters down where I wanted, ran a credit card across them, then painted yellow. Once dry, I peeled the vinyl. You’ll want to touch up the white if the paint bleeds.
In the second I wanted a more ombre look, as you can tell. I also wanted two different fonts and couldn’t find pre-cut vinyl in anything other than a block font. So, I used carbon paper for the word “sun”. If you’re wondering how to transfer text with carbon paper, here’s a tutorial! Once the paint is completely dry, just remove the lettering. You’ll prb notice my paint bled under the letters, but I actually liked it, so I left it as is. Easy peasy, lemon squeezy!
If you think this is pin-able, go ahead and pin it! Also, don’t forget to follow us on Pinterest.
This post contains affiliate links. For more information please see our disclosure policy.


Sarah Bailey says
Love this idea – my head is now buzzing with loads of chalkboard ideas! Thank you so much 😀 x
Ashley says
If you have more ideas, we’d love to hear them! I am chalkboard obsessed. 🙂
Jen @ PinKWhen says
What a great idea!! I want to make a calendar for sure, but I may make it larger and have the dates on it. Inspiring!! Thanks for sharing ladies 🙂 (I would also like to go to the City by The Bay!)
Ashley says
A calendar is a great idea! There are just so many things you can do with chalk. And when I use the bistro chalk pens I feel like I have my very own Starbucks in my house! haha Did you enjoy my drawing of the Golden Gate Bridge? I should just pretend my daughter drew it. 🙂
Tabitha Vos says
I love these ideas! I have heard of chalk paint a few times now. I want to try something with it one day!
Ashley says
It’s awesome! I’ve used it many times and love it. Definitely takes two coats for most things though. I’ve had one can for prb 9 months though bc it takes forever to go through.
Lisa says
I have always avoided chalkboards because of he mess, but these bistro pens are intriguing. Are they less messy than regular chalk? Do the erase better/cleaner, too?
Ashley says
Hi Lisa! Bistro pens definitely don’t leave that dusty mess that outside chalk does. I used them on a decorative chalk easel once from Rod Works and it didnt erase the way I liked. I painted over it w new chalk paint and it was much better. It must’ve been whatever product they used bc once I redid it, the chalk came off. I use a baby wipe to clean mine and it works great!
Lisa says
Thanks! So many nifty hints from you girls!
diane says
Great idea and thanks for sharing!
Ashley says
Hope you’ve been inspired to make one of your own!
Katherine says
LOOOOOVE THIS!!! Very cute and my kids are obsessed with chalk. Oh and I’m in the bay area so I loved seeing that as your countdown too 🙂
Ashley says
Chalk and kids go hand in hand. Good thing we can make cute things for chalk to go on! 🙂 Where in the Bay Area? I’m from the east bay.
Granny Beth says
I’ve been looking for something like this to use for my workouts. In stead of counting how many days, set a goal and count backwards. Say 7 workouts a week, then 6 , then five . How much more satisfying.
Ashley says
That is so unique and a fantastic idea! If it were me, I’d say 4 DAYS UNTIL I get to eat chocolate cake. I have a serious eating problem! haha. I admire your strength to be so committed to working out!
Danielle @ We Have It All says
OMGosh I LOVE this, thanks for sharing!
Ashley says
Thanks for your comment!
Nicole says
I just love the whole chalkboard deal! I love all your ideas with this! I am a new from southern charm! I would love for you to check out my blog and hopefully follow me back! Nicole
Ashley says
Thanks, Nicole! I followed what I think is your blog on bloglovin’ (nicole-southerncharm.com) as well as your FB from my personal account. Hopefully I found the right “Southern Charm”! Love that hutch you found for free! Im a little jealous. 🙂
Traci says
This is an absolutely adorable idea. I just started learning how you use my Cricut cutter so I think I will make one of these signs for myself. Thanks for sharing.
Traci
Ashley says
So glad you enjoyed this tutorial, Traci! If you make something similar, please share! Have fun with your cricut. 🙂