Welcome back to Lesson 24!! We are so close to being done with our bootcamp series. I hope you have enjoyed it as much as I did. Last week we learned all about Print and Cut from start to finish in Silhouette Studio. This week we are learning all about the Stipple Feature. Silhouette Boot Camp is filled with mini lessons that help us learn the terminology used in the Silhouette Studio software so that we can cut any design we can dream up with ease!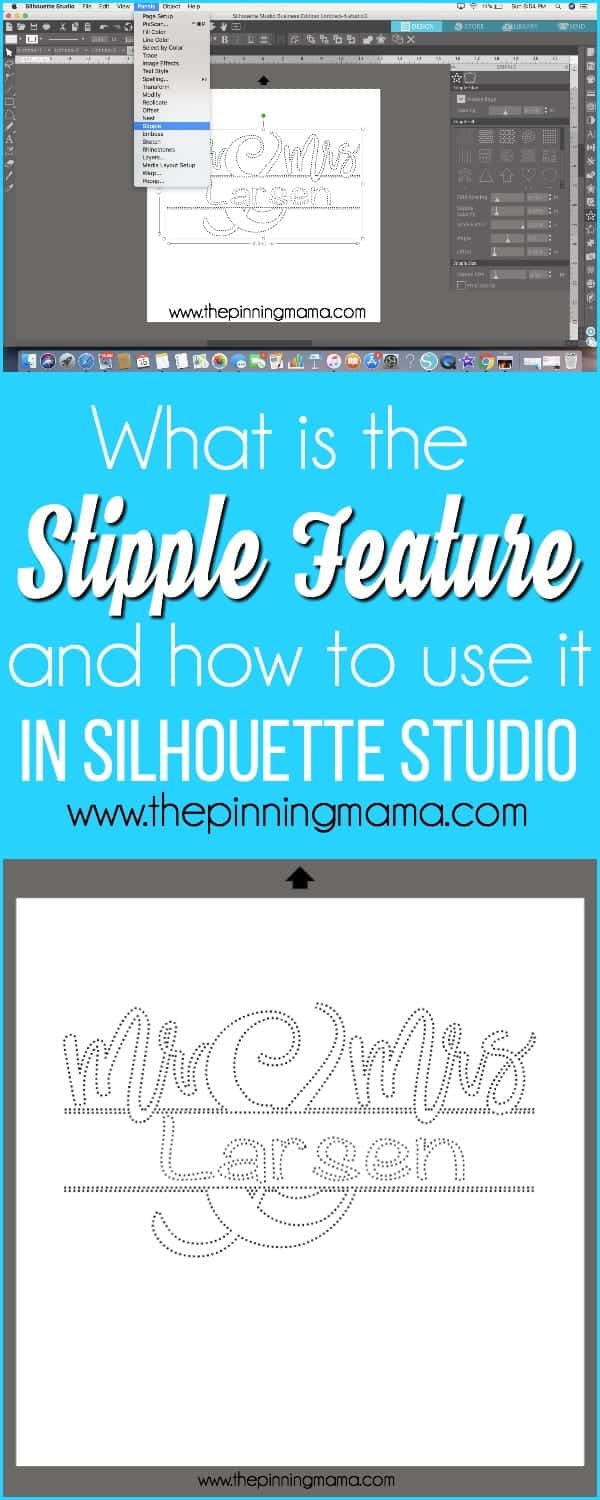
Before we get started, there are a couple of things to help you get the most of the experience:
- If you are new here, take a look the Silhouette Boot Camp Welcome with all courses listed and catch up on any you missed.
- Sign up for my Silhouette Newsletter which will email you when the lessons are released each week. {click HERE to sign up!}
- Pin this post! Each of these lessons takes me on average, 8-12 hours to create for you. I can do these lessons for FREE thanks to your support in coming to my site, reading the tutorials and sharing it with your friends. By pinning this post or sharing it on Facebook with your Silhouette friends, it helps you know where to find it if you need to reference it again, and it helps me spread the word so that I can keep the resources and freebies FREE to you!
What does Stipple mean in Silhouette Studio?
As defined in Silhouette Studio….stippling is making a design with a series of dots. The stipple feature is only available with the CAMEO 3 and Curio Silhouette machines. The CAMEO 3 can stipple with a marker, a felt tip pen, and a pen holder. This can be done on paper or other materials. The Curio can stipple on thin metal sheets by taping on it or by using a marker or felt tip pen on paper.
How do I use the Stipple feature?
The Stipple panel is located on the right hand side of your screen. It looks like a star with a dotted line on the outside. Once you have opened the panel you will find lots of different features. The first tab of the panel is to stipple designs you have already in files. You simply decide what design you want. If you choose to just stipple the edge click the box that says Stipple Edge. This will give a dotted line around the outer edge of your entire design. If you choose to fill your design in it will give a series of dots inside of your design. You can adjust the spacing of your dots in your design if you wish. Grid spacing in the first tab zooms your selected design large or small. Stipple spacing changes the size and spacing between the dots inside your design. Angle controls the angle of the pattern/dots. Offset controls how far from the edge the dots are.
Where do I find the Stipple feature in Silhouette Studio?
You can access the Stipple panel in a few different locations.
- Right hand side of the screen, Stipple Icon (Star with a dotted line), click on it and you will find the Stipple feature.
- In the top menu, click panels, select Stipple, and here you will find the Stipple Panel.
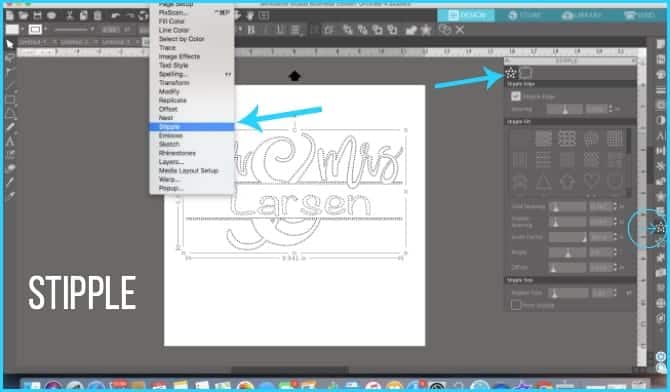
Example of using the Stipple feature :
I do not have a Curio so I will be showing you how to set up your CAMEO 3 to print a stipple pattern with felt tip pens. I decided to make a fun print for our gallery wall. I bought the outside design in the Silhouette Design Store. I then added our last name on the inside using the Noteworthy font. Next I used the stipple feature and selected to stipple the edge. I’m going to print this using a gray pen in my Silhouette CAMEO 3. 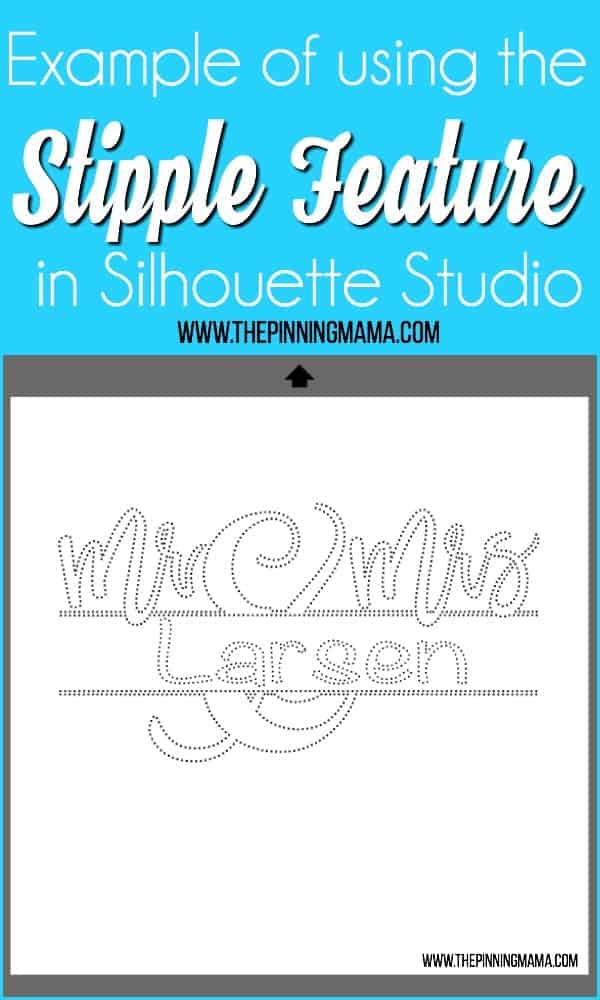
When to use the Stipple feature:
Anytime you want to make a fun dotted line pattern using markers or felt tip pens in you CAMEO 3. You also use the Stipple feature in your Curio on thin sheets of metal. This is a fun feature to use when making signs or saying out of metal.
Special notes on using the Stipple feature:
Before sending your design to be printed, make sure you have the correct options choose in the send tab of Silhouette Studio. This way your silhouette knows what you are planning to print and on and what blade or pen color to use.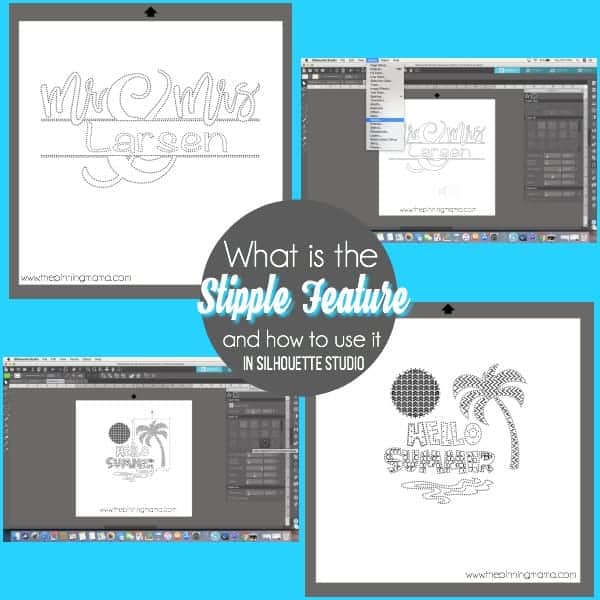
That’s all I have for you today on how to use the Stipple feature. Tune in next week to learn all about Cut Lines… explanations and types.


Terri Cass says
Kimber On your print and cut tutorial, do you have to have a certain type of printer to make stickers?
Emily says
No, I just use sticker paper and my normal printer. The Printer I use is laser jet but any color printer would work.
Terri Cass says
Thank you! I was a little mixed up as some say to use only one type of printer because of the ink smearing or something
Terri
I enjoy your videos. I have had mine cameo 3 for a yr. now as I am still learning. I am not computer savy and I need very basic instructions especially all the clicks for just doing the lettering on the screen. My daughter has to help me each time I do something. I am afraid to do it on my own. I have 26 grandchildren and there is so much I could be making.
Thank you!
Terri
Dee VanSomeren says
How do you use stipple lines inside the design and cut lines on the outside? I was trying to cut a pumpkin design, “Pumpkin”, by Paige Evans. I wanted to just stipple the curved lines in the inside area of pumpkin but cut the outside outline. Is that possible?
Thanks,
Dee
Patrice says
Thank you so much.! The tutorials are excellent.