There has to be a balance you can strike somewhere between picture-perfect party and doing things affordably.

Confession: I’m A Cheapskate
As I mentioned in Cheap & Easy Party Decor Part 1, my baby girl, Hallie just turned 1. I always want to have perfectly coordinated decor, the cutest accessories so that it looks like you ripped my party out of a magazine page. Then the cheapskate in me kicks in and says “NO WAY am I paying $5 for ONE tissue paper fan!”
Something I LOVE at parties is when they have coordinated backdrops. I think that no matter where you have the party this can bring a theme or color scheme together. When I saw this pin for this adorable fan backdrop I immediately knew that I wanted to make it for Hallie’s party. When I went to the pin though it was a Cricut tutorial. I don’t have a cricut but thought maybe I could read the instructions and find a way around it. No such luck. There weren’t really any instructions!
So the next most logical thing for me to do is to look into buying paper fans so I could hang them all together. I found great tissue paper fans on Amazon here and here but they were around $5 each which was a little steep for what I was wanting to do, especially considering they are just made of tissue paper!
Of course the conclusion could only be that I concoct a way to make it myself!
Wrapping paper is like my secret weapon for parties. I use it in so many ways. It can add interest as a table runner. Wrapping paper can make walls coordinate and bring together the color palate as a super simple backdrop for any party.
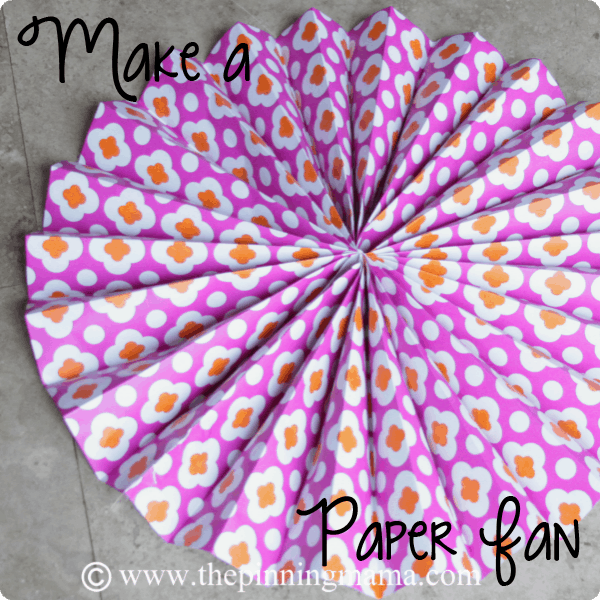
So to my trusty wrapping paper I went. I felt like it had an advantage over tissue paper because I could pull in more pattern and texture with it. So I grabbed a roll and started experimenting. Once I figured out the method it was too easy! And the end result exceeded my expectations!
Supplies To Make A Paper Fan
- One small roll of wrapping paper (20 sq ft, the roll was about 18″ tall and I got it on the dollar aisle at Target)- This will make 4 large fans)
- 14 sheets of coordinating 12″x12″ scrapbook paper (2 matching sheets for each of the 6 fans, plus 2 for the centers)- This will make 6 small fans
- 10 Twist Ties, or pieces of curling ribbon or string
- Scotch tape
- Hot glue gun and hot glue sticks
- 1 Large piece of cardboard (mine was approx 3’x1′ and I cut it off of a box we got in the mail)
- Scissors

Step 1 – Fold Accordion Style
First we will make the large fans. Take your wrapping paper and fold it approx 1.5-2 inches in the length of the paper. Flip it over and fold it back over this fold as closely to the same size as possible.
Continue folding accordion style until you have made 20 folds in the paper and cut it off evenly.
Take your folded stack of paper and compress it together and fold it in half and crease it.
Tie a twist tie, or piece of curling ribbon or string around where the crease in the middle is tightly, but without wrinkling the paper.
Step 2 – Fan Out The Folds
You will now fan out the folds using the fold as the center point of your circle until the ends meet.
Now use your clear scotch tape to secure the ends together.
You will repeat the same process with the scrapbook paper, except that each piece will make half of a fan and securing two pieces together will make the whole fan.

Step 3 – Cut Out Circles
Next cut 10 circles out of your remaining sheets of scrapbook paper. I used a glass from my kitchen and traced circles for the centers then cut them.
Hot glue the circles to the middles of the fans.
Now that you have all of your fans made you will arrange your backdrop.
Using your cardboard as a base, lay out your fans as you would like them to look making sure that they overlap each other at points and at least all of the large ones touch the cardboard substantially. I started with my large fans and filled in the small fans until it looked just right.
Step 4 – Secure Your Paper Fans
The next step was the most challenging for me. I took a picture of it with my phone and then disassembled it back to the 4 large fans. Then use your glue gun to secure the fans on the ridges touching the cardboard in as many places as possible to the cardboard base.
Layer in your smaller fans gluing them to the base or the larger fans.
You are done! As complicated as I may have made that sound, it really was pretty easy and probably took me around 2 hours start to finish to complete.
Perfect Paper Fan Decoration (For Pennies!)
The final cost of the project was probably around $3, including the $1 roll of wrapping paper, 14 sheets of scrapbook paper at pennies a piece, and a few glue sticks.
It was perfect for the First Birthday Party but I also think it would look great as decorations at a bridal shower, a retirement party or even baby shower decor. It brings in the colors, and adds interest without being all themey and cutesy!
Don’t forget to check out DIY Party Decor Part 1! To see great ideas for drinks, gift bags and more! Check out all of The Pinning Mama DIY Crafts here.

Need ideas for party food? Check out these Mexican Appetizer Cups or this Greek Party Dip!


And cake…. don’t forget CAKE! This one is a definite winner!

Although we didn’t have a character type theme, we focused on the colors pink and orange and throwing in lots of fun textures like ruffles and folds. What will the theme be for your next party?


Megan says
KIMBER! Pinterest just led me to you! I am so excited! You are a celebrity, and I know you! WOW! Making decorations for my daughter’s first birthday- going to give these a try! You are amazing. XOXO
Kimber says
I am so happy you found me! First birthdays are SO much fun. I am so glad you are enjoying your sweet girl! We should definitely catch up sometime 🙂
Amanda says
Such a great idea! Made one for the dessert table for my parents 30th Anniversary & I Love how this turned out. Totally going to be a staple from here on out! Thank you for the easy peezy tutorial!
London Accountants Lady says
So cute, I think the fans would be a lovely thing for the kids to be involved in making, and choosing their own patterns!
Lawrence says
Hand fan plays a big part of our life in China. I like how you teach us to make the paper fan. Cute!