*** If you are new here, Welcome! You might want to follow The Pinning Mama on Facebook to get updates and crafting tips! We also have exclusive freebies jut for our fans to download there! To see all of our freebies click here.***
Two years ago when my husband was coming home from Pakistan I knew I wanted to make his homecoming awesome- you know, with signs, balloons etc. I decided I NEEDED a red, white and blue wreath to go along with my American flag I’d have waving outside on my front door. I searched and searched and was kind of shocked at how expensive wreaths were in general! I saw a few that were adorable, namely ribbon wreaths, but they were way out of my budget. I knew my happy little fingers would smile when I decided I could make my own. Now it’s kind of an addiction and I need them for every holiday! I’m so excited to share with you this easy easy easy ribbon wreath tutorial. Whether it’s Christmas, Spring time or another occasion, there is a wreath that can be made! Here is a similar burlap bubble wreath we shared a while back.
Who doesn’t love a happy wreath hanging on their front door?

What you need:
- 14 inch Styrofoam wreath form
- 1/2 yard of burlap or ribbon
- 16 yards of wired, 1 1/2 inch thick ribbon in your color choice.
- Ball point pins
- Scissors
- Ruler
Instructions:
Wrap your wreath form with either colored ribbon or burlap. Pre-cut your ribbon into 4 inch long strips. My yellow ribbon was not wired and I really preferred using wired ribbon because it laid nicer. Unless there is a ribbon you’d die without, go with wired!
Fold your ribbon in half (hamburger style) and then at the bottom bring the ends together (hot dog style) and push a ball point pin through. Then stick it into your wreath form. Push your ribbon down a little bit so that it takes up more space and isn’t just sticking straight up. I liked the ribbon bubbles to be closer together, so I used a lot of ribbon. I probably could have used a lot less ribbon had I been ok with a looser affect. Whatever floats your boat! When you’re just about done, remember to save some space so that you can add a piece of ribbon so that you can hang your ribbon wreath!
Seriously, anyone can make this. No “I’m not crafty” excuses! The hardest part was picking out the ribbon patterns! 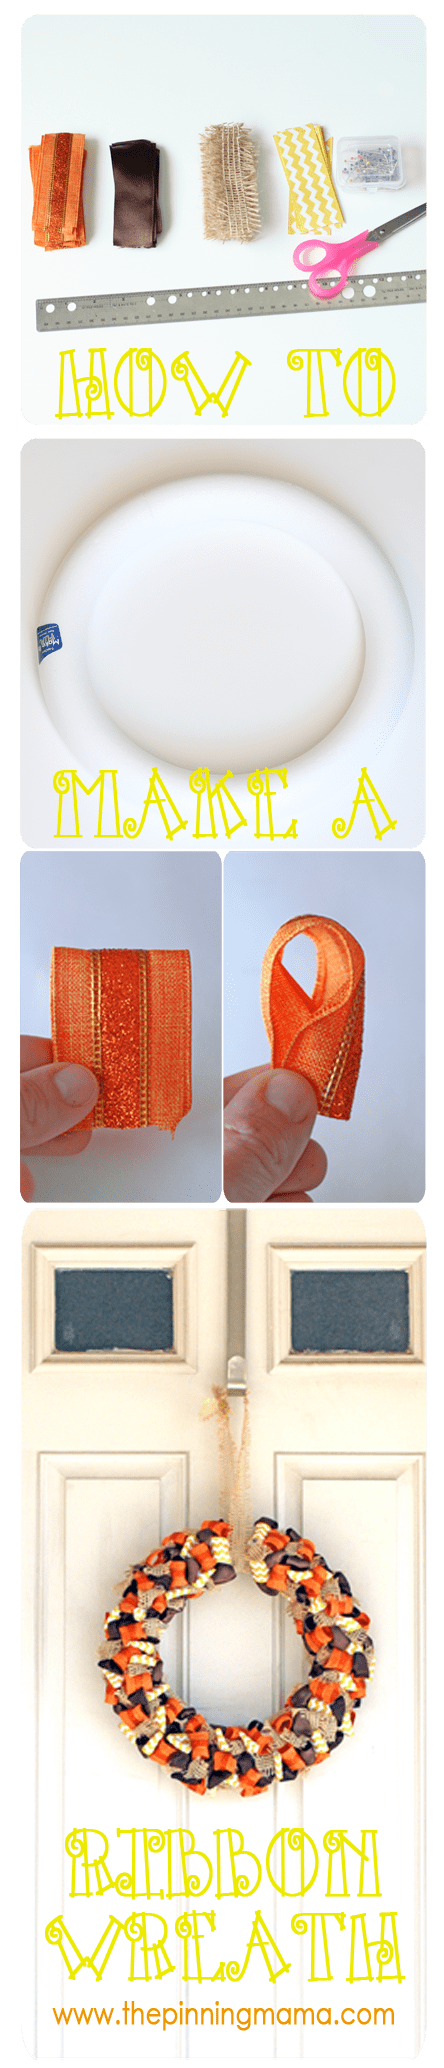
For another wreath tutorial, check out this Burlap Bubble Wreath tutorial!


popcosmo says
Gorgeous – I like both wreaths for different reasons and different seasons!! Love how simple they are to make b/c as much as I like a good craft, I like them to actually look like the picture when I’m done, haha!
xo ~kim & chloe
Ashley says
There is nothing more frustrating than finishing a project and then looking at the inspiration and having them look completely different!
Jen says
LOVE IT!! I have this pinned to my Wreaths board on Pinterest. I need to make a new wreath and you have just given me the inspiration! 🙂
Ashley says
Thanks Jen! I bet you will come up with something super cute!
Recreateanddecorate says
This is a super cute wreath, and I agree, I hate finishing a project and it looks nothing like it was supposed to! I wonder how an orange and blue would look on my new front doors!
Ashley says
go Gators! How could that not look amazing?
Geralin @ Metropolitan Organizing says
This looks like a fun project that I could do with my nieces – they love a good project and I’m not too crafty so this might just be good, clean family fun! While Wanda is making a “Go Gators” wreath, I might have to be a copy cat and create a Go Heels (UNC, Chapel Hill) competing wreath.
Ashley says
Done! We also liked you back on FB. 🙂 I totally have rug envy!
Nicole says
Cute wreath! Found you on the DIY’ers and am now following via email!
Ashley says
Thanks Nicole! Glad you found us. Ill like you back tomorrow. 🙂
Tracy - FrugalorFree.com says
Wonderful twist on the diy wreath, can’t wait to make mine . I included this in my diy Halloween roundup.
Ashley says
Thanks for stopping by to let us know! Ill def check it out. 🙂