This post contains affiliate links. For more information please see our disclosure policy.
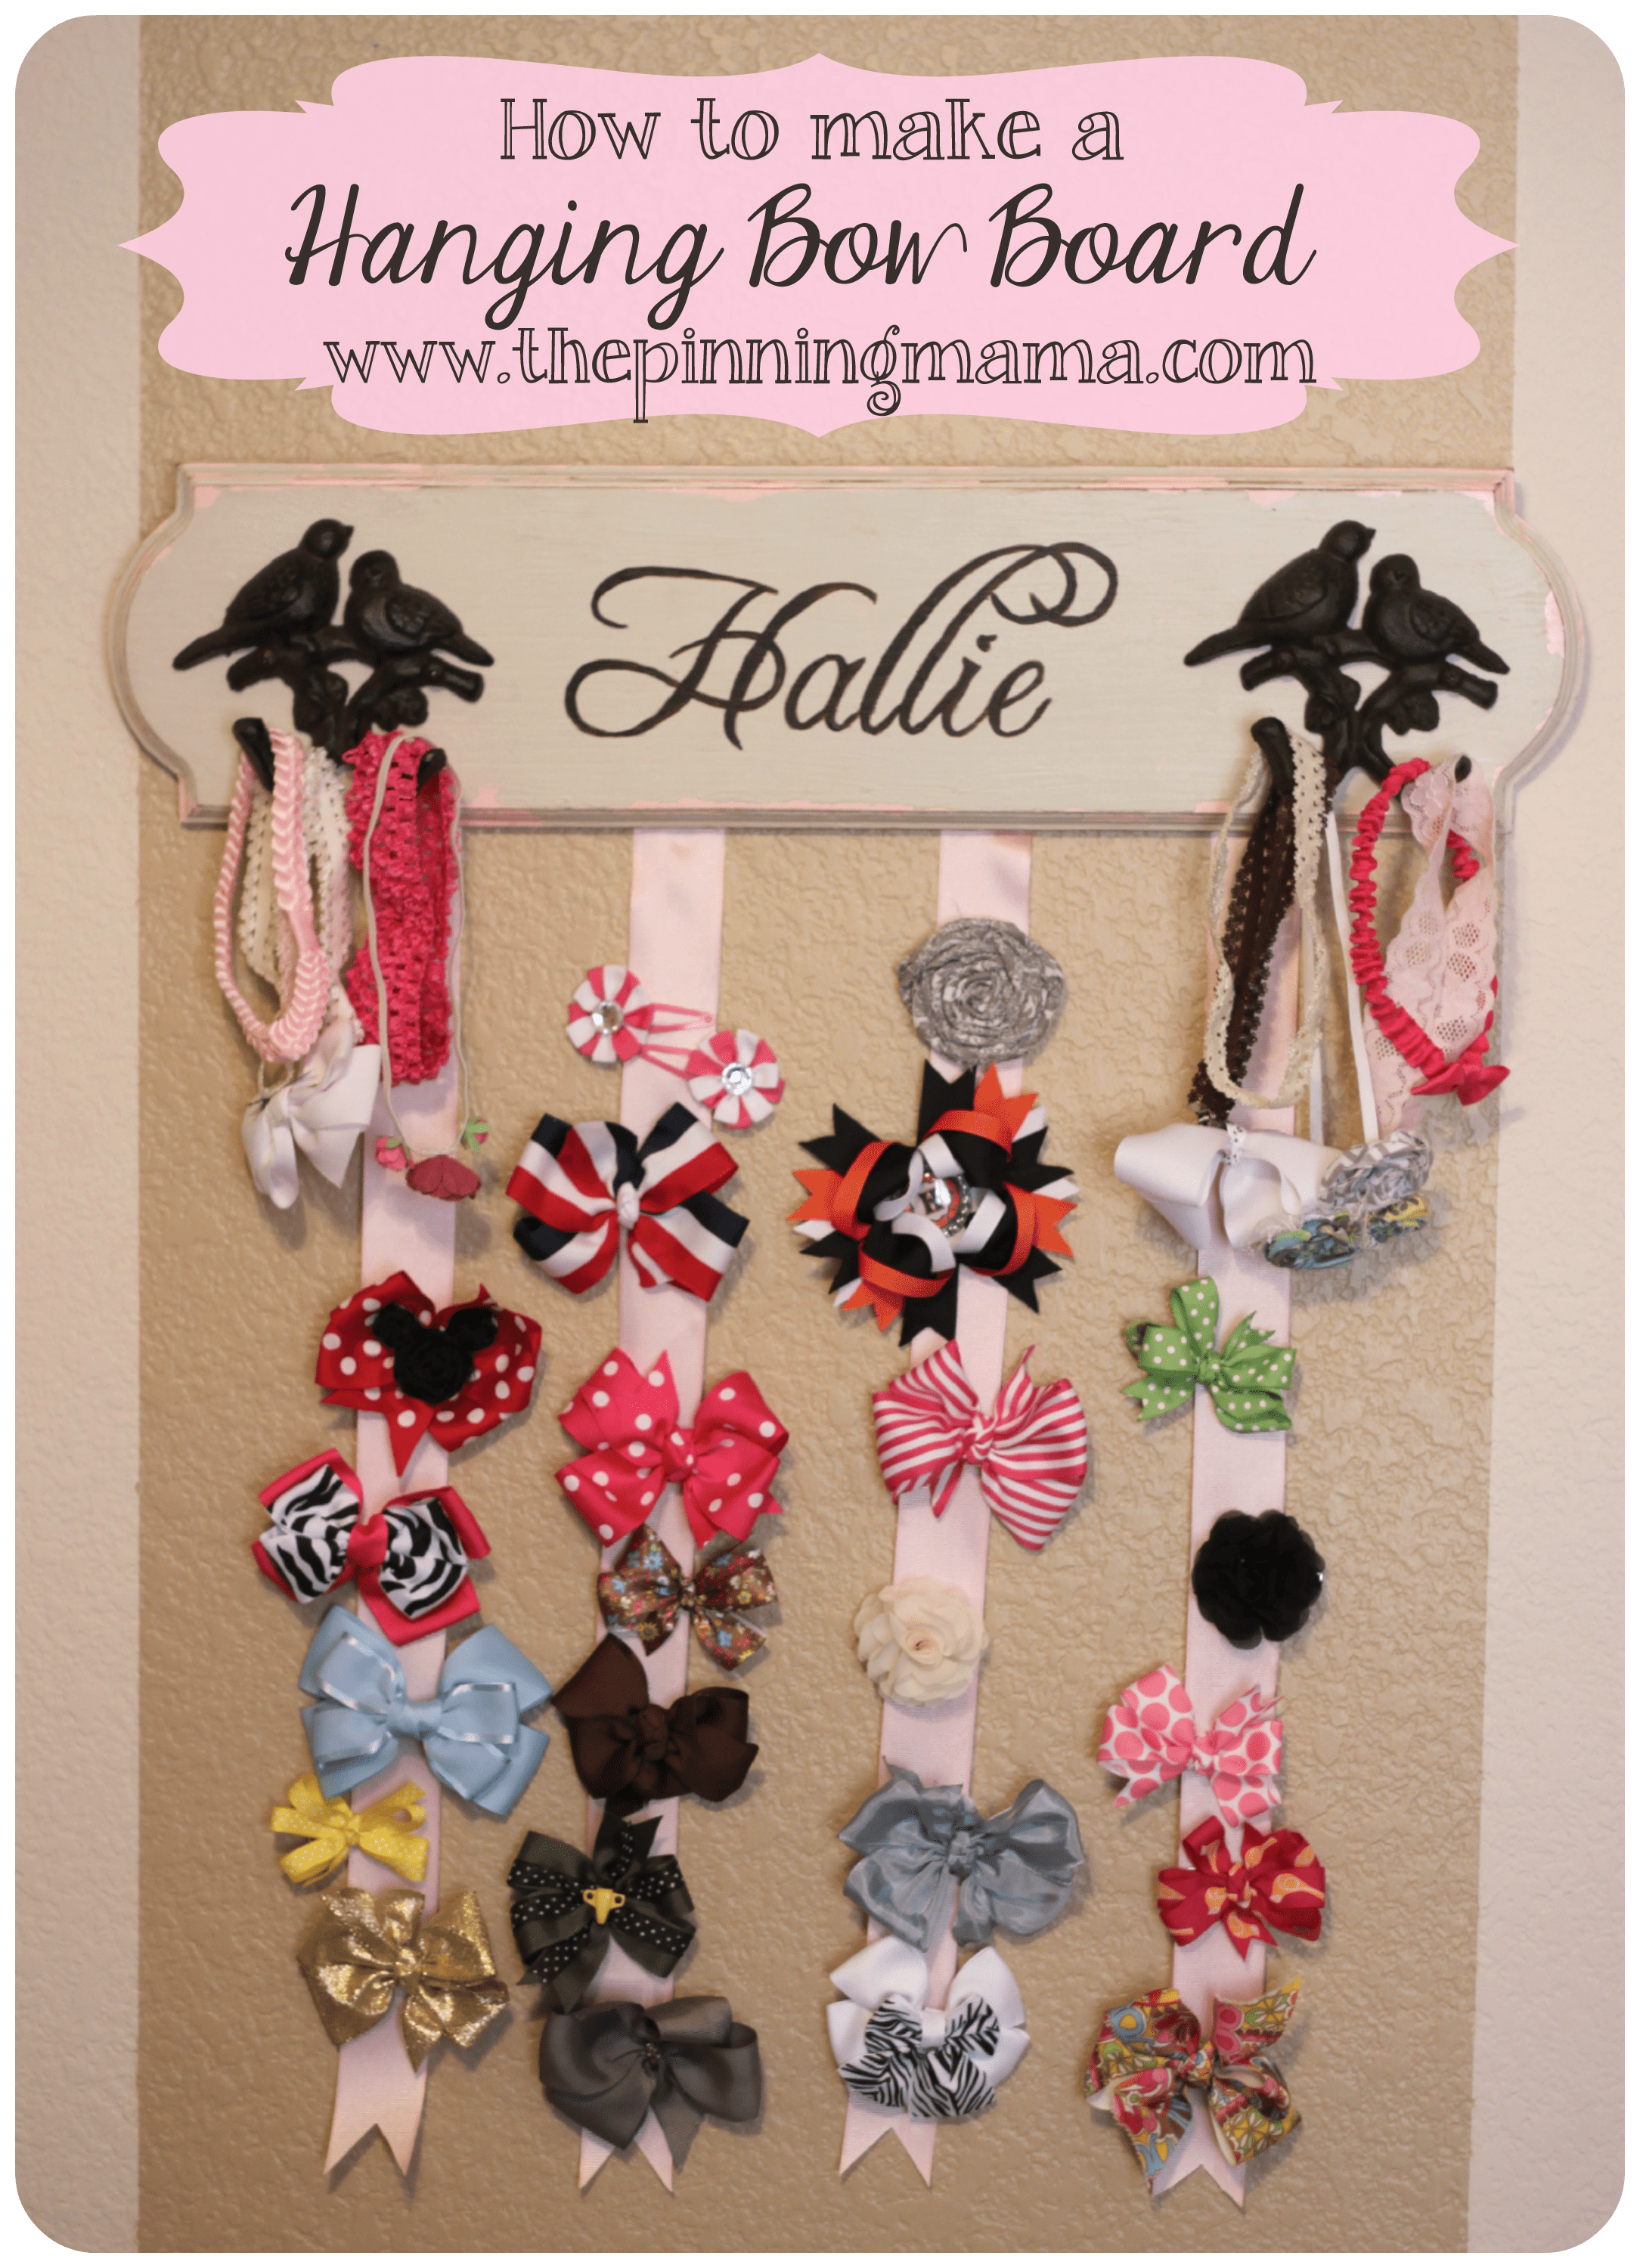
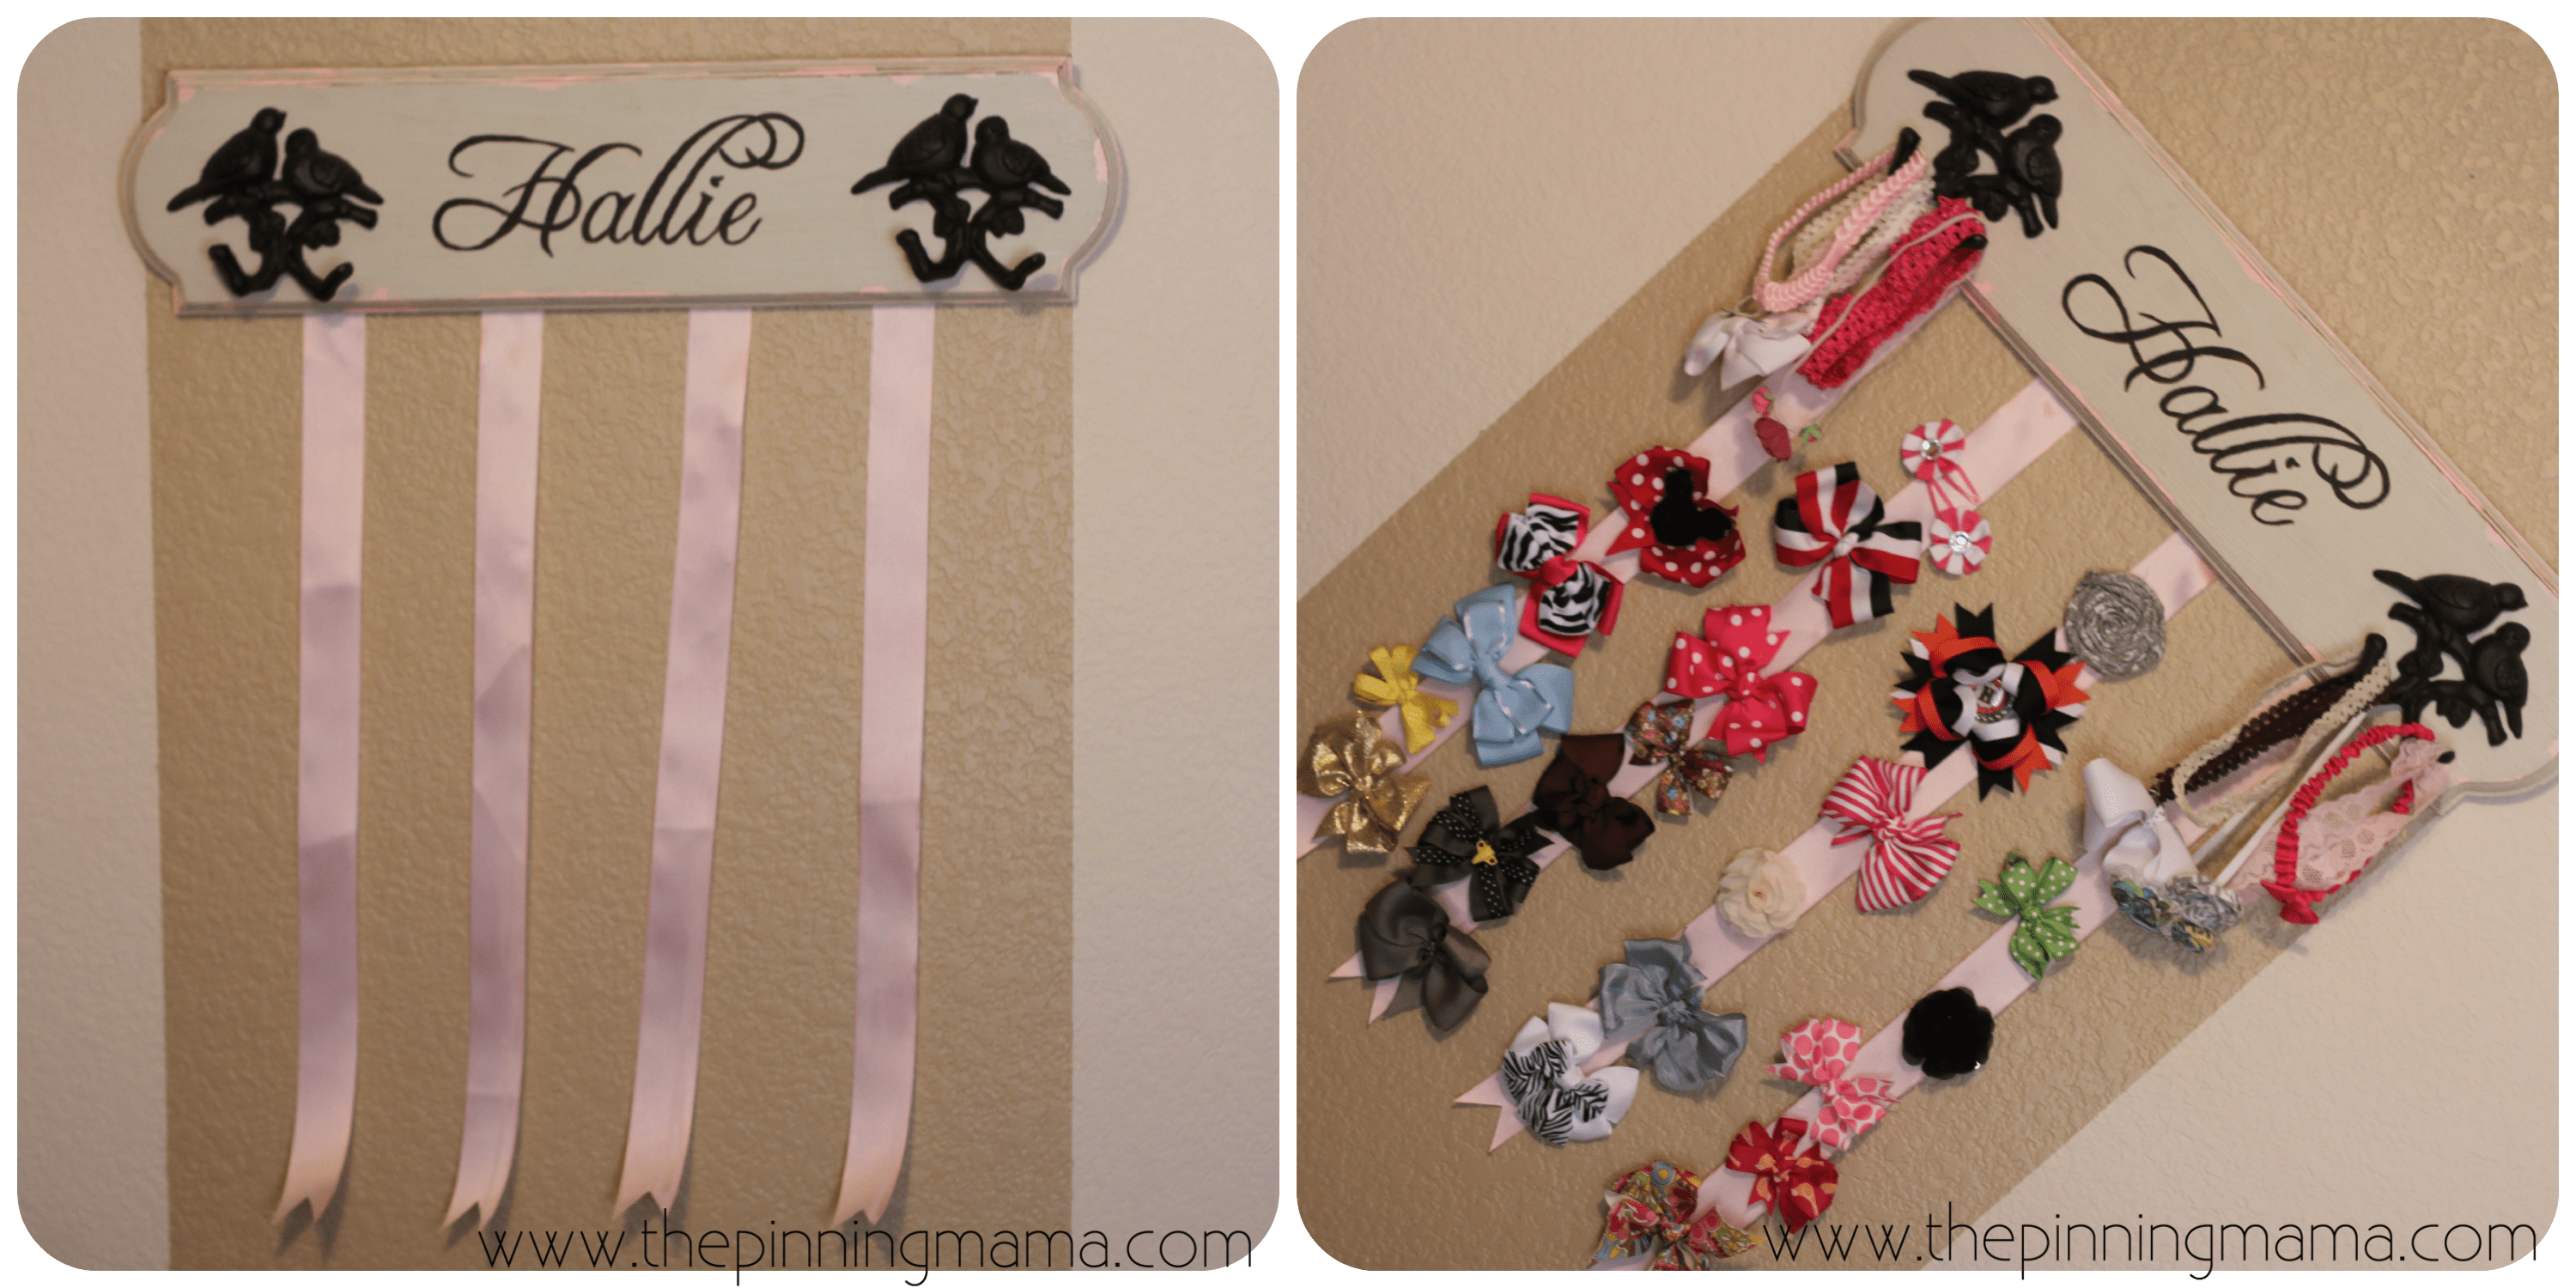
Based on an overwhelming need, making a new hair bow board organizer has been on my to do list for a while. How many hair bows can a 10 month old baby girl accumulate you ask? Well… maybe you shouldn’t ask! Today I finally finished my hanging hair bow organizer for baby girls room. I already feel so much less cluttered!
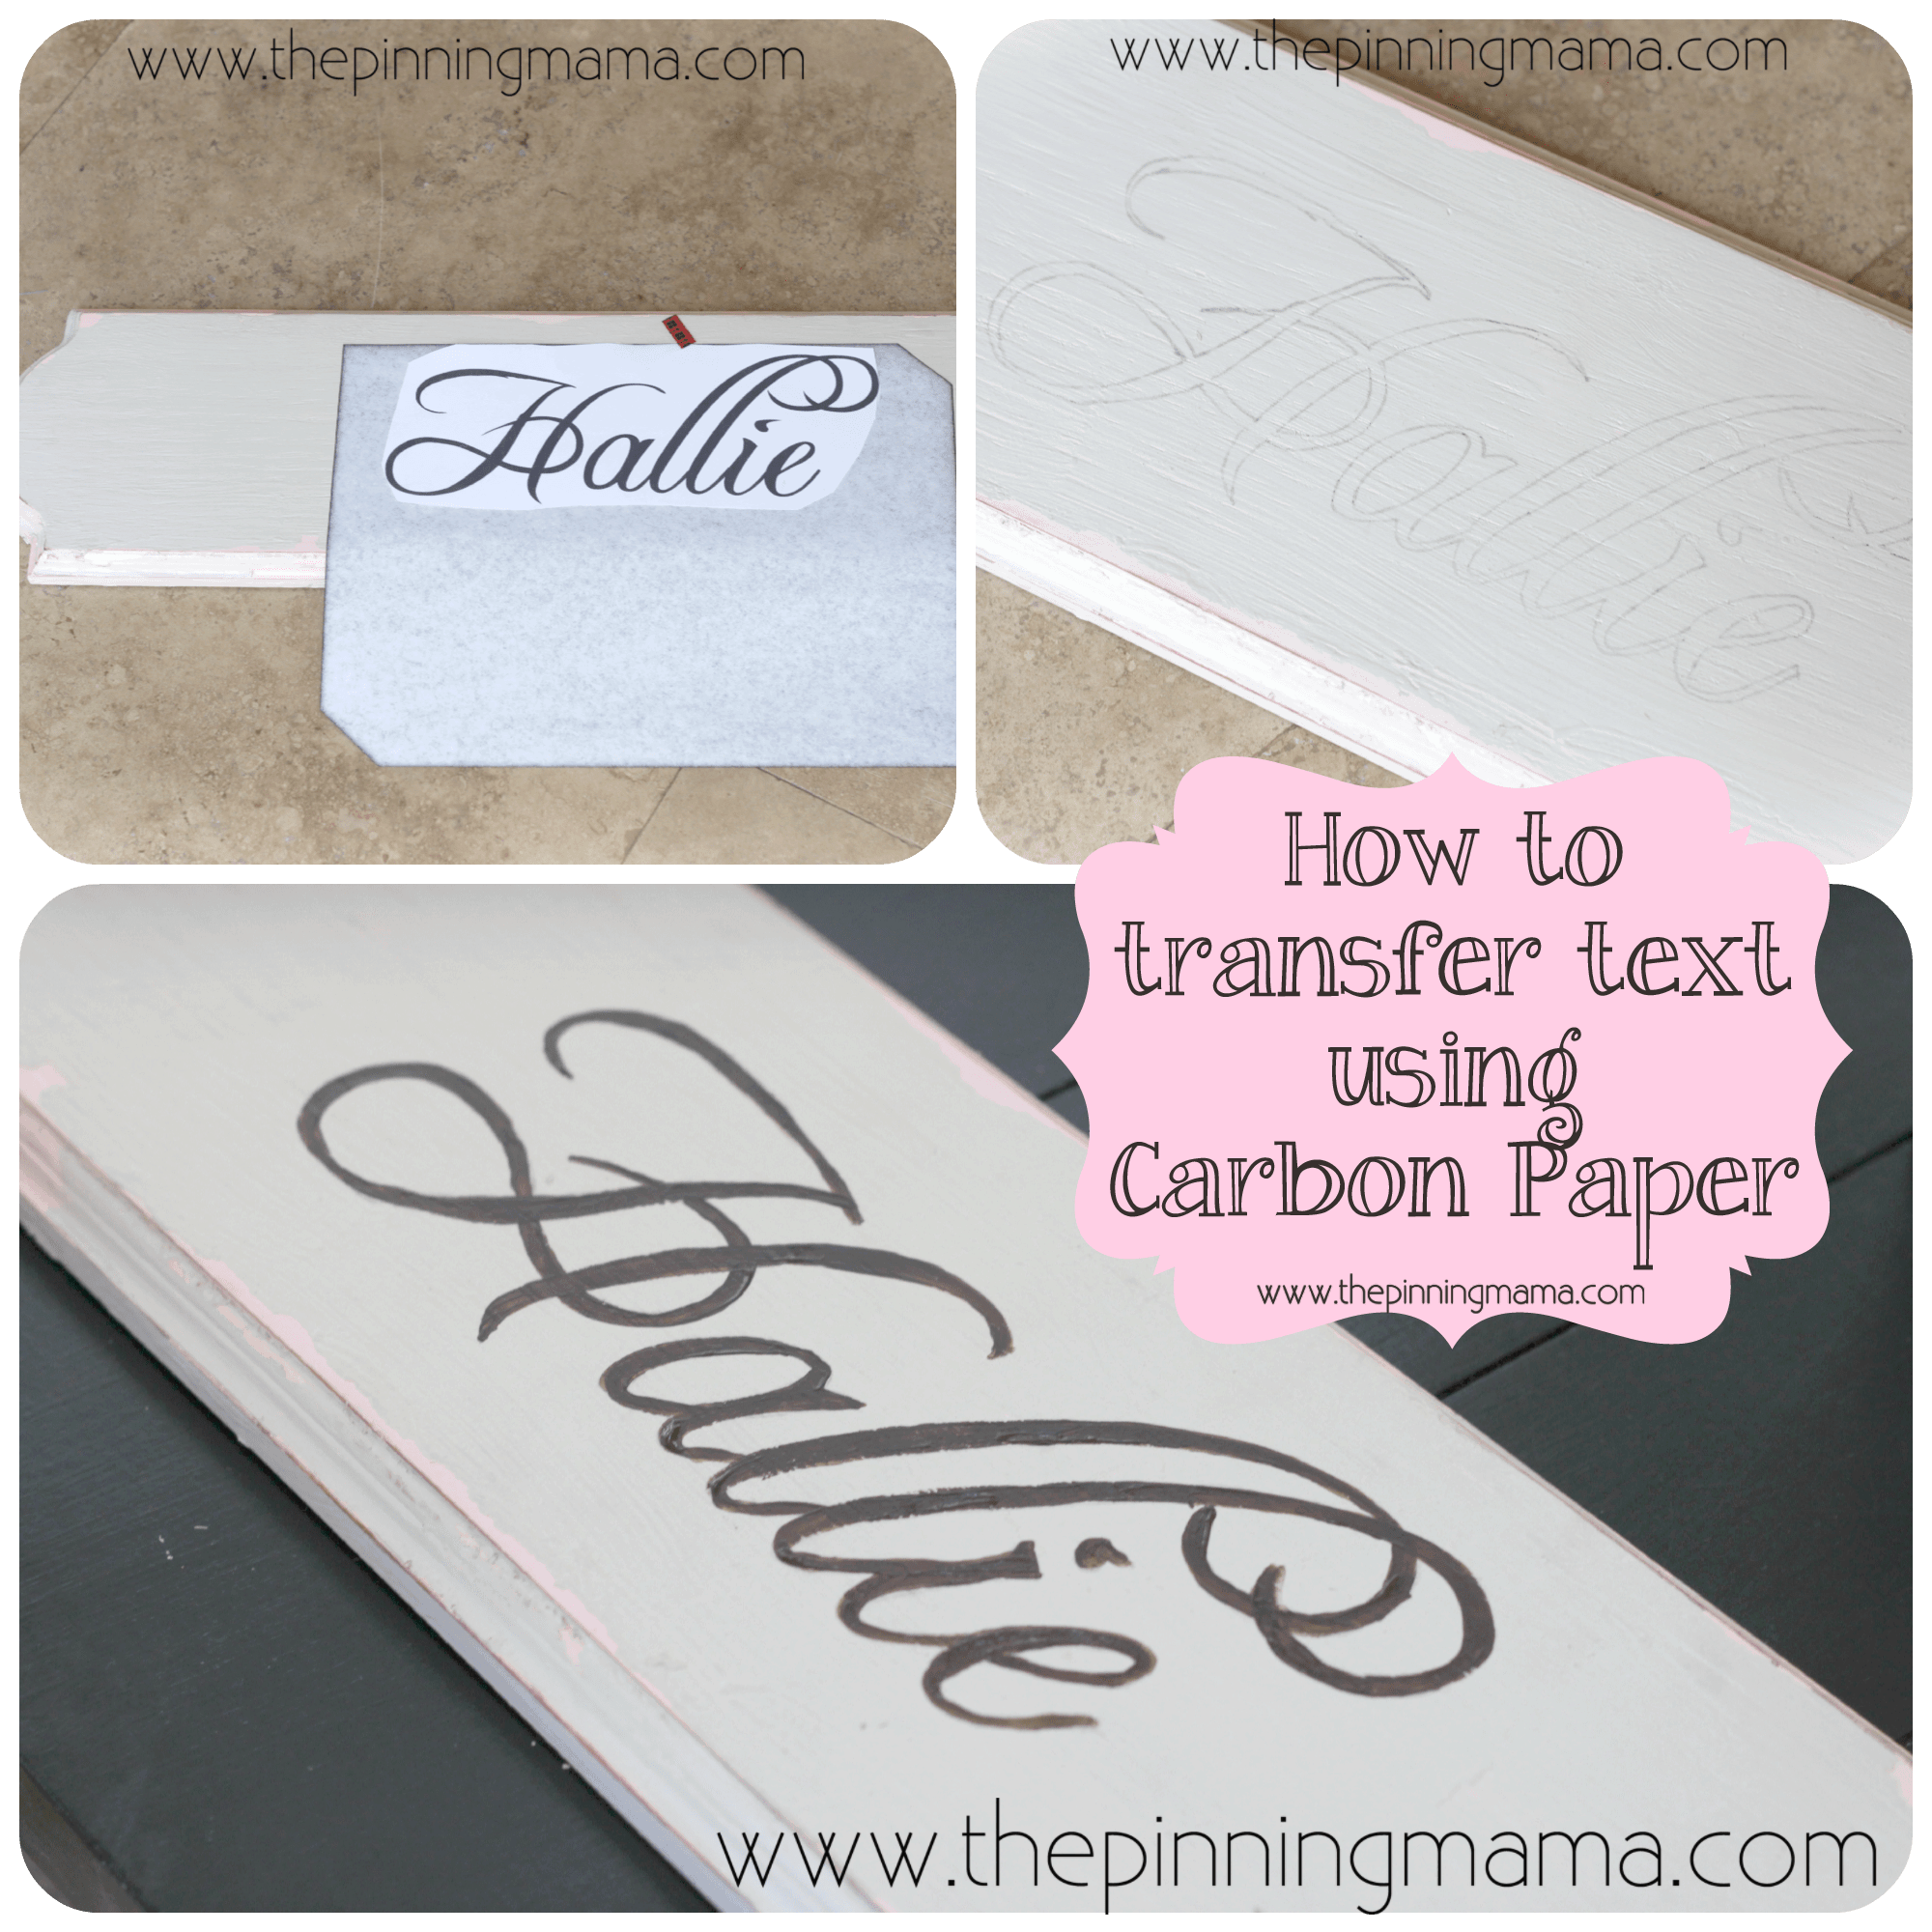
If you remember we started the bow board by taking an inexpensive raw wooden board from Hobby Lobby and painting it to get a vintage, distressed chippy paint look. You can see the tutorial on how to create the chippy paint look here. After the board was distressed, the next step was to add the text. In order to transfer the name to the bow board I used Microsoft Word to print it out in exactly the size and font that I wanted. I cut around the name then taped it exactly where I wanted it onto the bow board. Next take the carbon paper and with the dark side down, slide it between the name and the bow board. Then all you have to do is use a pen to trace on top of the word, making sure to get every nook and cranny, and the carbon will transfer onto the bow board as you see below!
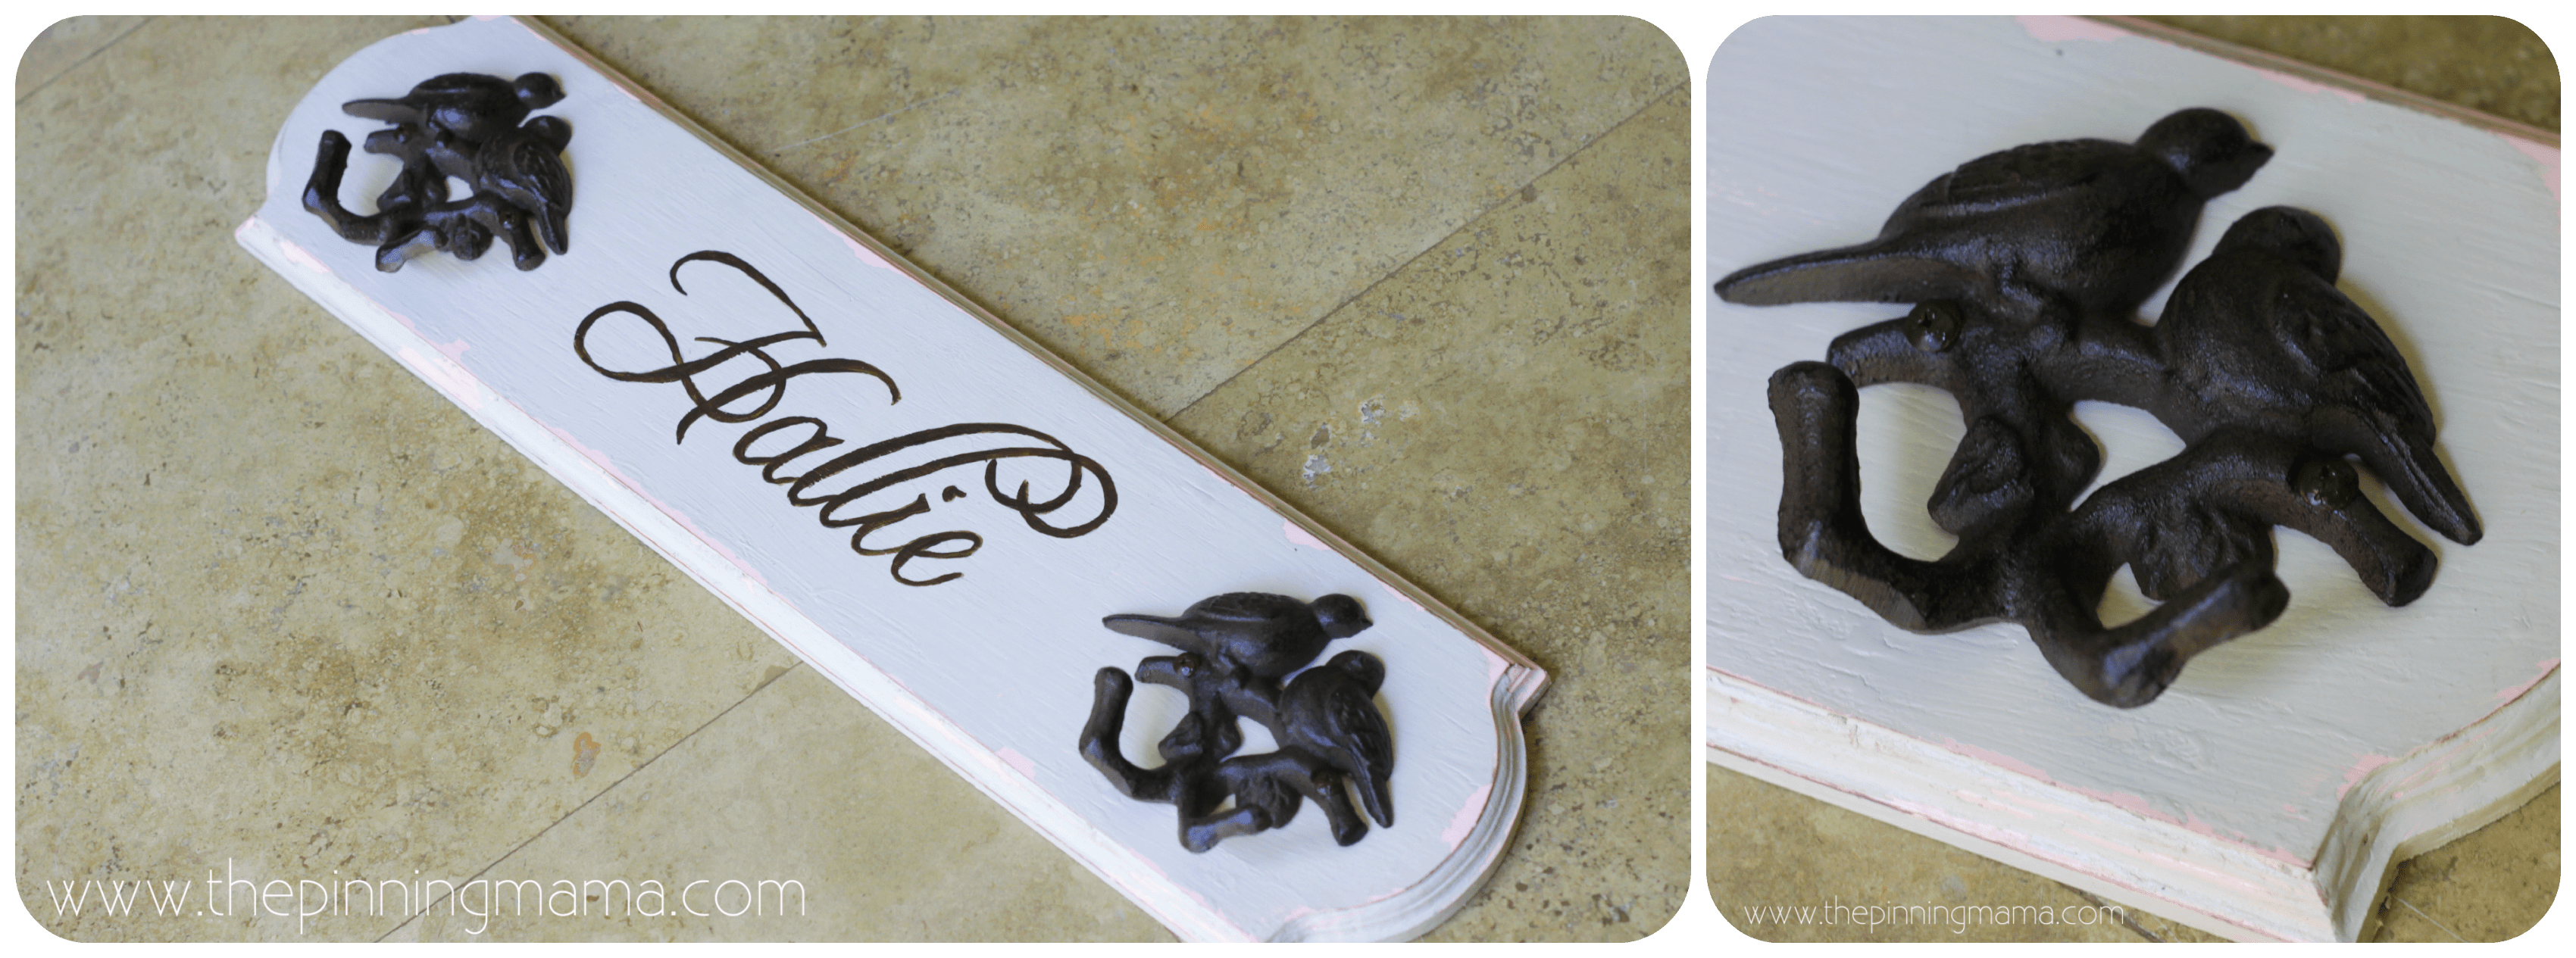
After your words are traced onto the bow board you will want to use craft paint to fill in the outlines in the color you want. TIP: I have found that the smaller the brush is, the easier it is to control when you are doing the fine lines of text. These Martha Stewart paint brushes would be perfect.
Next you will want to find some hooks to add on the sides of the bow board to hang headbands. I found these cute little birdie hooks at Hobby Lobby, but you can find lots of absolutely ones online to be delivered straight to your door like these shabby chic hooks, another birdie hook, or these cast iron Victorian hooks I am totally in love with! The hooks I bought I was able to just screw in to the bow board and then add a little paint over top to hide the shiny silver.
After the hooks were on I measured the ribbon and added it to the bow board. I chose to use 4 pieces of 1 1/2 in grosgrain ribbon so that I could space them far enough apart to hold good sized bows. I want this to be able to grow with her and not have to replace it until she grows out of bows! I measured and placed the ribbon evenly on the bow board. Using a fair amount of hot glue, and singing two fingers, I attached them to the back of the bow board.
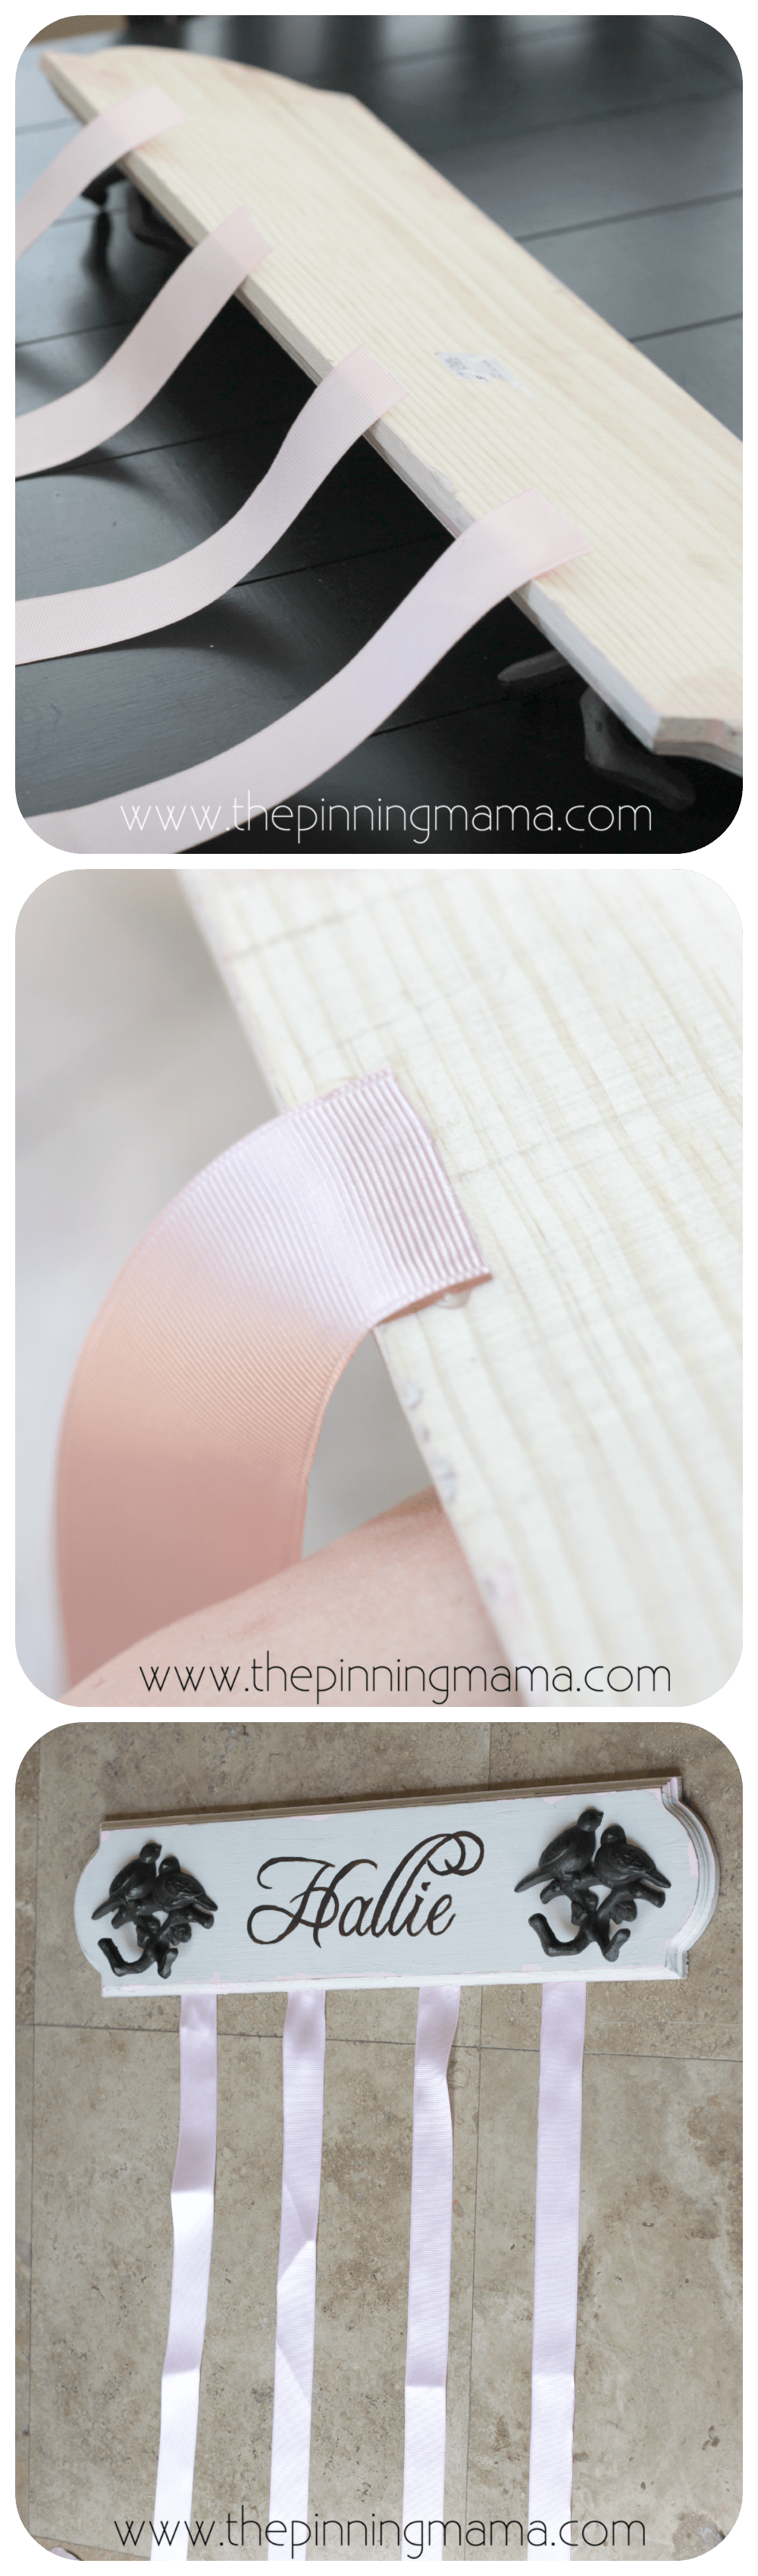
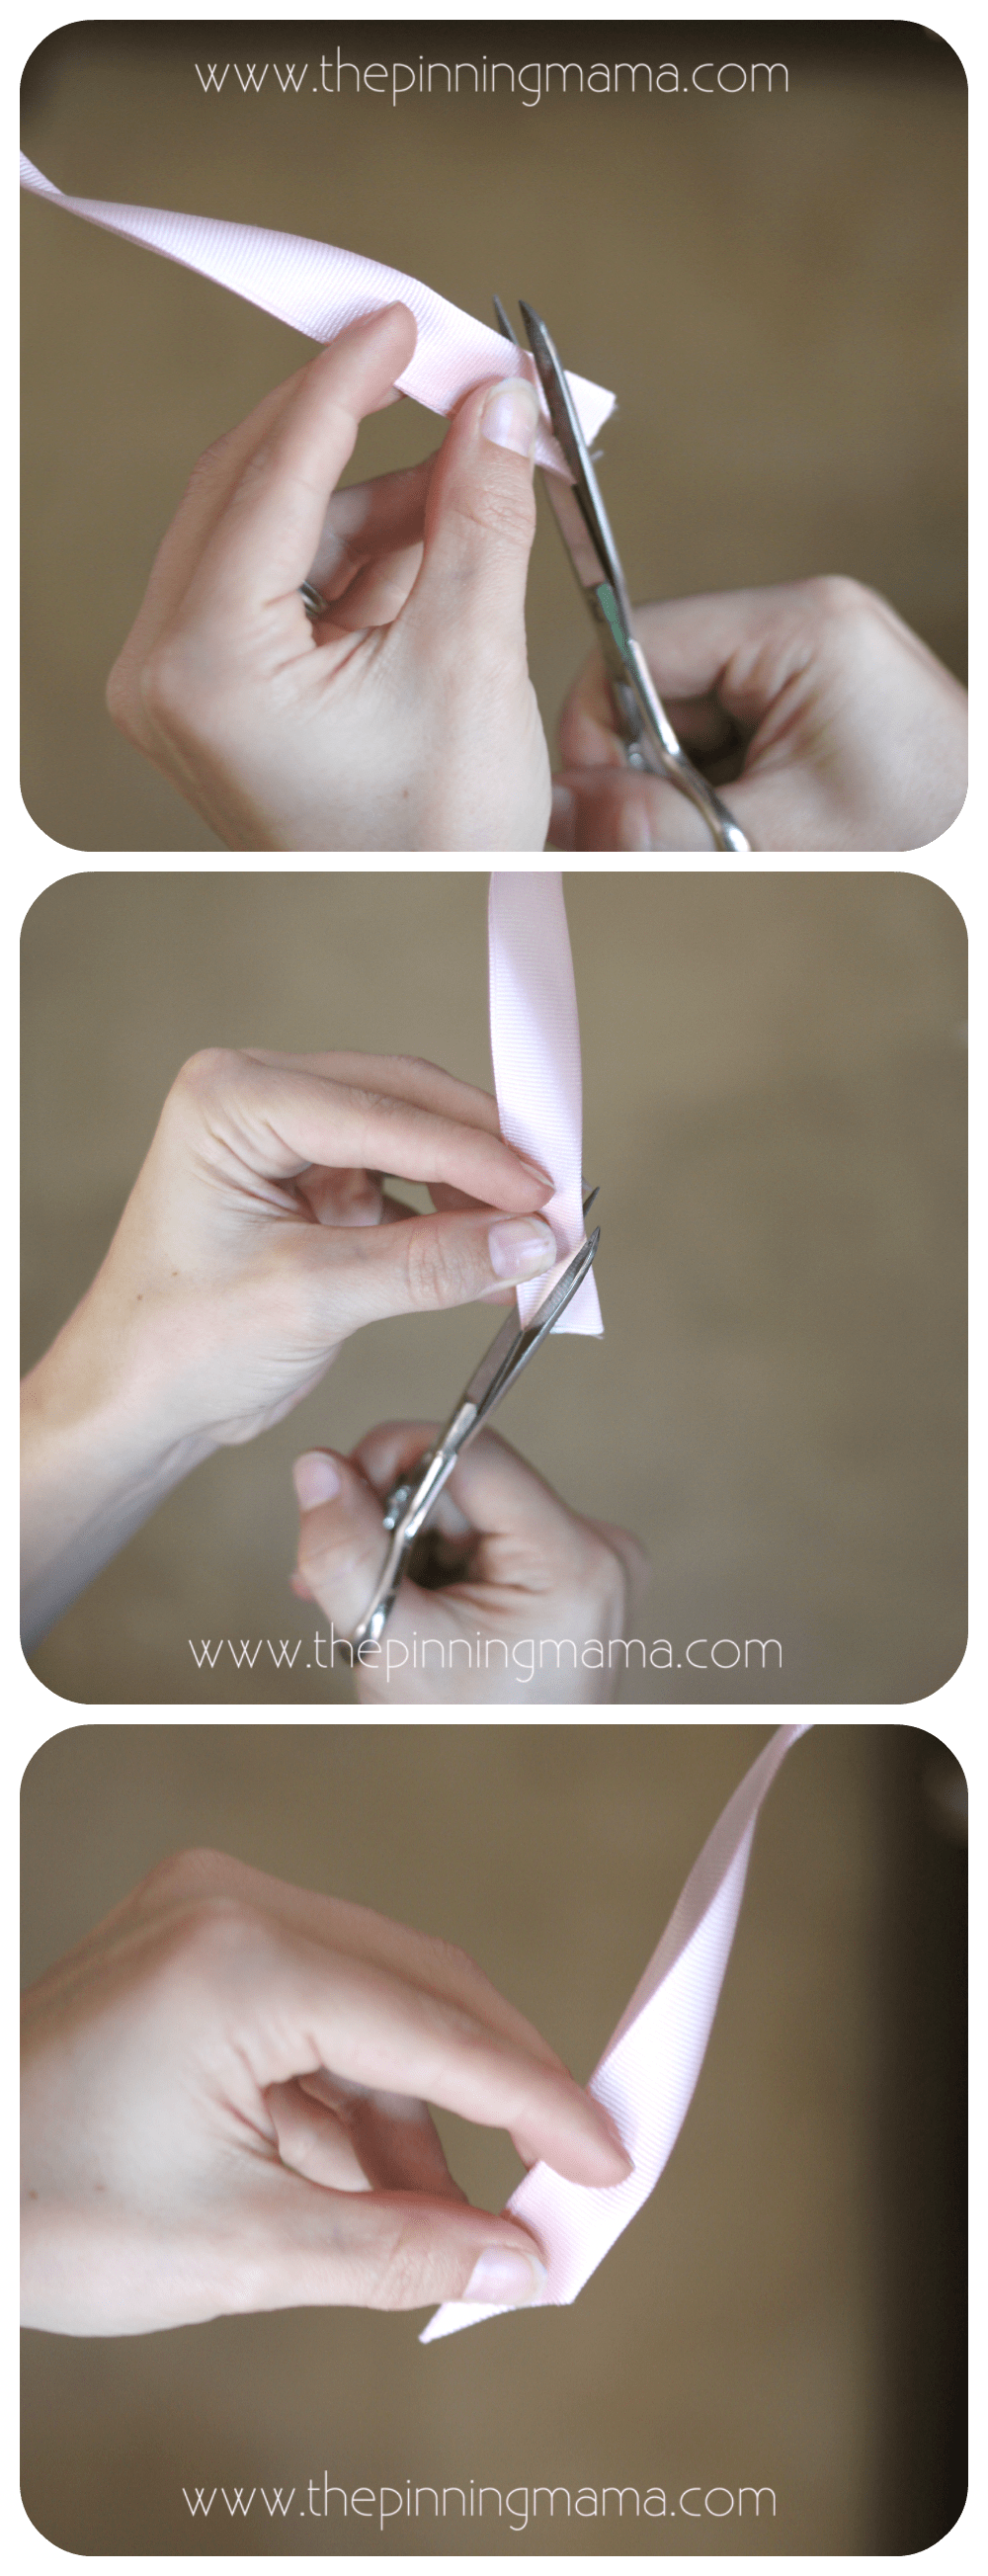
Now all that’s left is to trim the ends to give a finished look and add your bows! TIP: A friend once taught me the easiest trick to get perfect v shaped cuts at the end of your ribbon. All you do it fold the ribbon in half and cut diagonally from the outside edge toward the center. When you open it back up you will have a perfect V shaped end. Make sure you either seal the ends with a lighter or use Fray Check like I do. You don’t want any edges fraying as this grows through the years with your little girl!
Now just hang your finished hair bow board up and organize your hair bows! You will be so relieved when all of these accessories finally have a home!

Jen @ PinKWhen says
Love this!! Super cute. 🙂
Kimber says
Thanks Jen! Doesn’t every little girl need a good bow board?
Kimber says
Thanks Jen! I apologize, I think I missed your comment this morning some how!I bet you have lots of bows at your house! Every good southern girl does!
Ashley says
This is absolutely adorable! Love the name Hallie too. 🙂
Kimber says
Thanks Ashley! It was a long process picking out her name, but I LOVE it!
Sarah Bailey says
What a cool idea – it looks really easy to make as well 🙂 x
Kimber says
Thanks Sarah! It was a pretty easy project! I love things that are easy and customizable!
Kristi says
This has to be the most awesome thing ever! I am always losing my daughters hair stuff. You guys should sale these on Etsy!
Kimber says
Oh Kristi! Thank you! You are full of compliments and great ideas, but where do I find the time to open an etsy shop between mothering, being a wife, and blogging?!
Kristi says
Believe me I have more ideas that time haha. It is almost impossible to accomplish it all.
Alison says
Very cute, and so clever!
Kimber says
Thank you Alison! Maybe you need to add a little girl to your clan so you can know the joys of overflowing hair bows, haha!
Kim @ 2justByou says
I’ve tried to pin this so many times, but I keep getting an error. I can’t pin anything from your site. =(
~Kim
Kimber says
Hi Kim-
Funny enough, I was just looking at our Pinterest account and noticed that you pinned this at least 5 times! I think they did end up going through. I am not sure what the error is? Which pinning method were you using? We have two ways to pin things. 1. Use the Pin It button on any image or 2. Use the Pinterest icon at the top or bottom of the page in the “share bar” to pin. These are different applications so if one in particular is giving you a hard time, maybe the other would be easier. Also you can always copy the URL link and paste it into the create a pin page directly on Pinterest. I know that is much harder so hopefully there will be no more problems with pinning directly from the site. You are the first to tell me you have had a problem so hopefully it is just a fluke, but I will certainly keep my ears open! ~Kimber
Kim @ 2justByou says
Well, now I feel silly! I actually tried both ways, and I tried my own pin it button from my toolbar. I tried multiple times last night, and then I came back to try again today! That is when I also tried copy/pasting directly on Pinterest too. Sheesh…Can you tell I really like this tutorial?!? lol
But I left your page and tried pinning other things in different tabs, and it worked just fine (multiple ways of pinning as well). So I’m not sure. But I’m glad that it worked – finally! I deleted the multiples and just left one up on my board. Can’t wait to try it and make a bow hanger. This is the first one I’ve seen that I really like and will fit lots of bows!
Thanks,
Kim
Kimber says
Don’t feel silly! I am so puzzled as to why this is!? I have at times had trouble pinning things on various sites using Internet Explorer, but since I switched to Chrome I haven’t had any issues. Let me know if it continues!
Honestly I am so flattered that you like the tutorial so much as to put in that much effort! I am pretty picky about our decor too and I searched Pinterest and didn’t find exactly what I wanted so I just created my own with a couple of techniques I had wanted to try. I love the finished products and was just thinking if we ever need more room I could just add longer ribbons! So versatile! Thanks again for stopping by! ~Kimber
Deb Clem-Buckert says
This is great. Pinning this so my daughter can make one!
Robin Wilson says
I just love this! I have never seen anything like it. I can envision this as a gift for so many of my friends. Not so hard to make that I can’t handle. Thank you for the great idea!