How to set up your Silhouette CAMEO personal cutting machine. Step by step pictures and instructions to get your Silhouette CAMEO set up fast and ready to start creating!

![]()
Sometimes you have been waiting and wishing for your Silhouette for so long, once it finally arrives, you freeze with anticipation on what to do next! It was all leading up to this point, but now where do you get started? What do you need to do? How do you even set it up?
The good news is, IT’S EASY!
How to set up your Silhouette CAMEO:
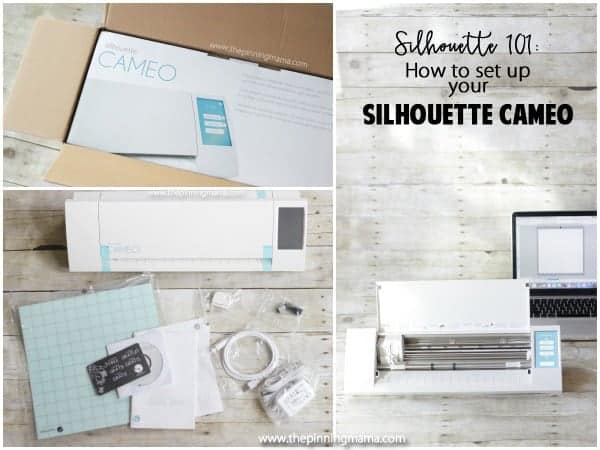
Step 1: Open the box!
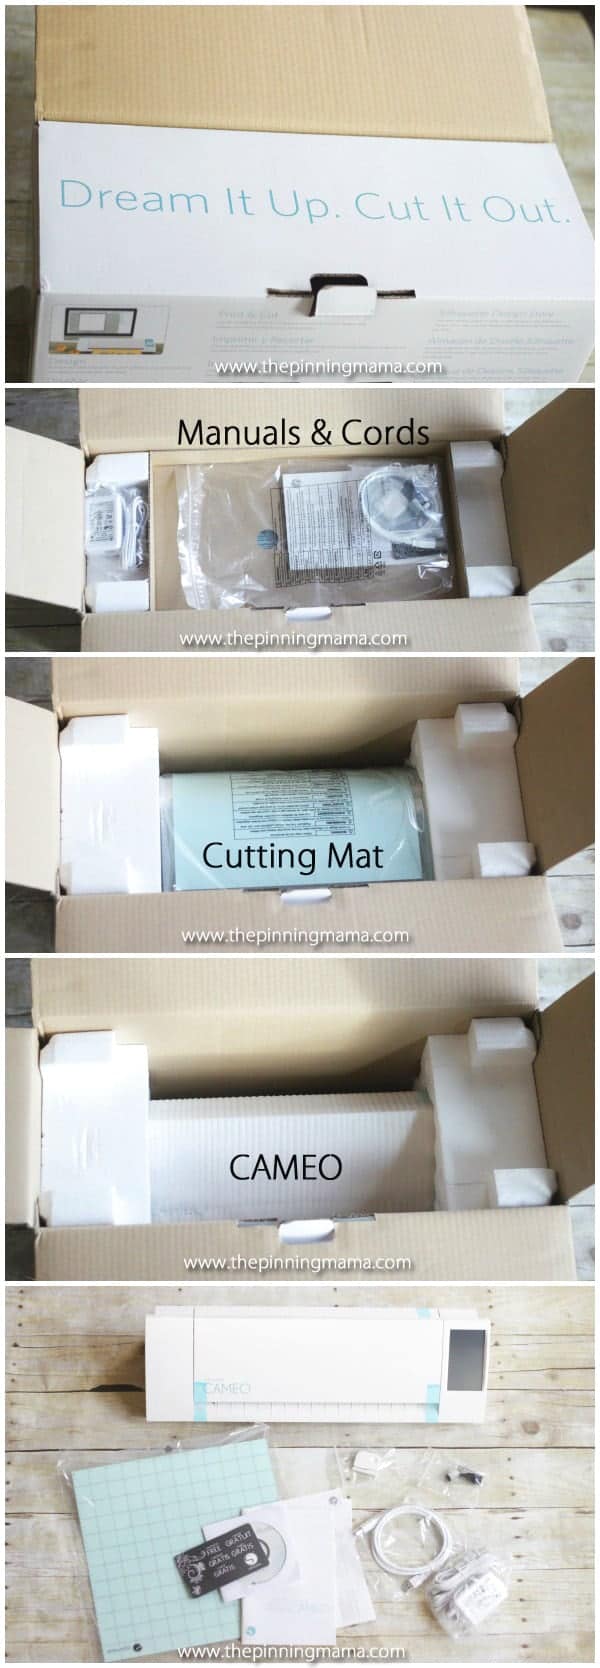
There are a few layers of stuff (technical terms only, of course!) in the box.
- Manuals, cords, and free design card- When you open the box lids there will be a cardboard tray on top with a bag that has the power cord, computer data cord, manuals, software, and free download card in it.
- Cutting Mat- After you remove the tray above you will see the cutting mat sitting on top of the machine.
- CAMEO- The last layer is the Silhouette CAMEO. You can remove it taking off the styrofoam ends and removing the styrofoam cover.
Now that you have all of the pieces out of the box, you can toss the box if you plan on keeping your machine out, or since we move often, I chose to store the box and Styrofoam ends so I can safely repack the machine when we pack up and move again.
Let’s take a closer look at what is in the box:
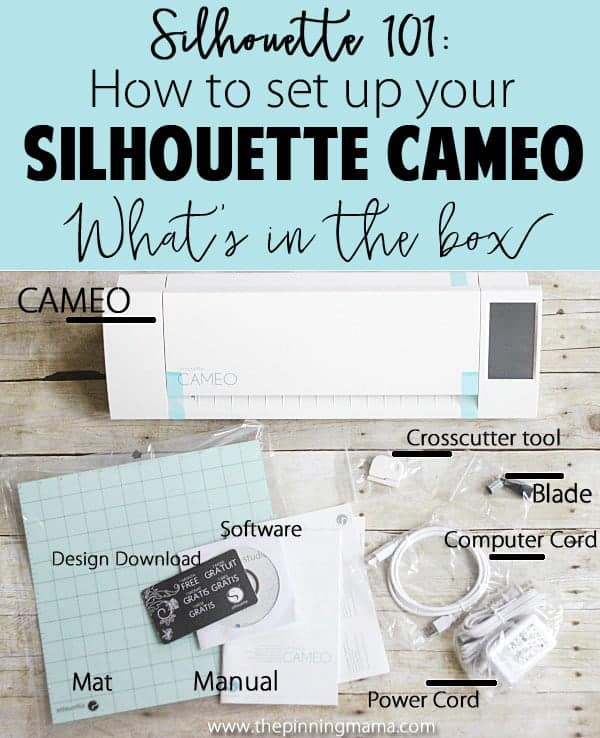
- Silhouette CAMEO- This is it! Your baby is here!
- Crosscutter tool – this is a little tool that fits in the slot in the back of the machine and will help you cut paper or vinyl that is on a roll.
- Blade- This comes with the blade you will put in your machine and a ratchet piece that you can use to change the blade setting. If you want to toss this piece you can because all of the machines made in the last two years or so have a built in ratchet on the left side of the machine that you will see when the lid is open.
- Design Download Card-
- Software- This is the Silhouette Studio software. You will use it to create your projects and designs and tell the machine what to cut. You can use this CD to install it on your computer or you can download it online at Silhouette America. You do not need anything other than a computer to use the software, so if you don’t yet have your machine you can still download it and start designing for the day your machine arrives. Also, there is no internet connection needed to use the design software, although you do need a connection to sync your library with anything you buy from the Silhouette store.
- Computer Cord- This is the cord that will connect from your computer to your CAMEO and tell the CAMEO what to cut.
- Mat- You will use this cutting mat to cut media in your machine. Mats are used with cardstock, various other types of paper media, and smaller pieces vinyl and heat transfer vinyl (HTV.) Some vinyl and heat transfer can also be cut without a mat.
- Manuals- All the details on the machine in teeny tiny print. Silhouette also has manuals online and a great help section on their website.
- Power Cord- This cord has two pieces. A power adapter side that goes to the machine, and a power cord side that attaches from the power adapter to the outlet.
Step 2: Prepare the CAMEO
The Silhouette CAMEO will come with various pieces of tape and foam in it out of the box to protect it during shipping. After taking it out of the box, the next thing you will want to do is to remove this extra packaging.
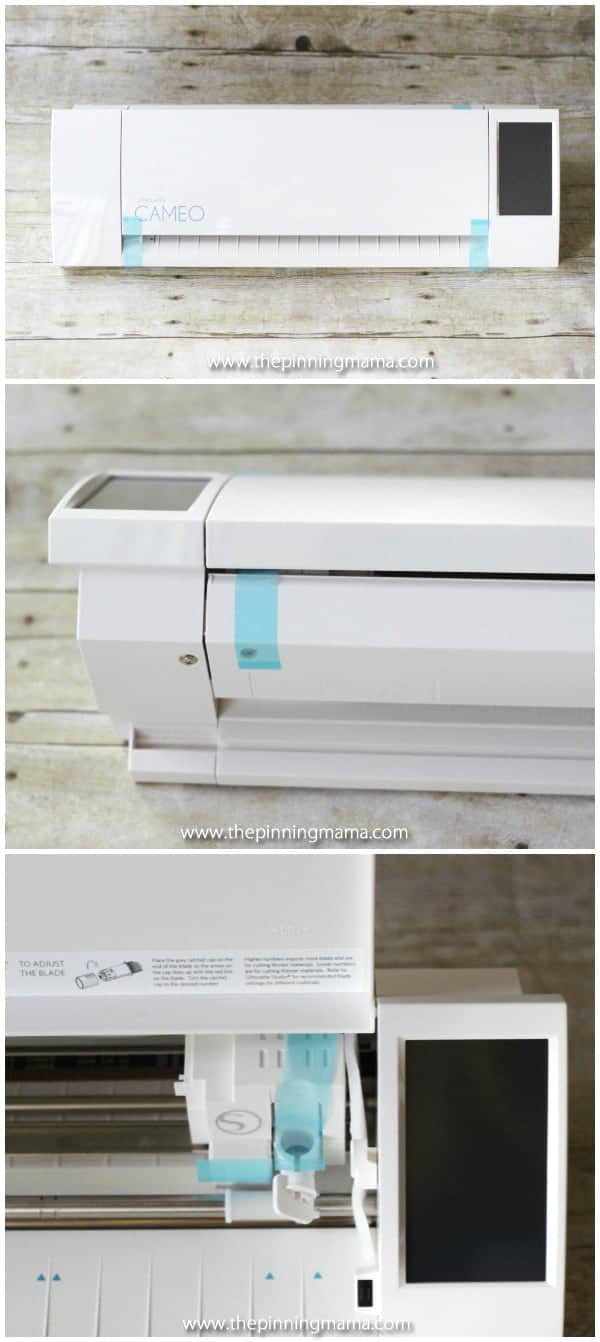
There are 4 pieces of tape and three pieces of foam to remove as it is currently packaged.
- The first two pieces of tape are on the front of the machine and should peel of easily!
- Now open the lid and find two pieces on the carriage. One is a small one positioned horizontally and easily removed. The other starts on the blade holder and goes under the lid to the back of the machine. This one isn’t too bad but is a little trickier since it keeps sticking while you try to pull it through the lid.
- Last remove the three foam pieces. There is one positioned between the side of the machine and the carriage and there are two underneath the carriage, one to the front and one to the back. You can push the carriage gently with your fingers to move it left a little and it makes it much easier to get the foam pieces out.
Step 3: Plug it all in!
This is pretty straight forward but I will give you a step by step just in case!

You will have three different cords you need for setting up your machine, one data cord that connects between the computer and the CAMEO and two parts of the power cord that connect together to connect the machine to the power outlet.
- Connect the two sides of the power cord together. It has a “right way” to connect, but even when it is lined up correctly, it is still a pretty tight fit so it might take a little effort to push it in the first time.
- Connect the small round side of the power cord to the machine and the other side into the outlet. The power connection on the machine is the one furthest to the back, on the right side of the machine when looking at it from the front.
- Next connect the data cord to the machine. The more square side will connect into the machine and the traditional looking USB side will connect into an open USB port on your computer. This connection will be the middle one. Note: There is also a USB port on the machine but this is used for a USB storage drive not the USB side of this communication cord.
Step 4: Turn it on and On Screen Set up
Once you have everything plugged in you are ready to turn her on and set up the machine!
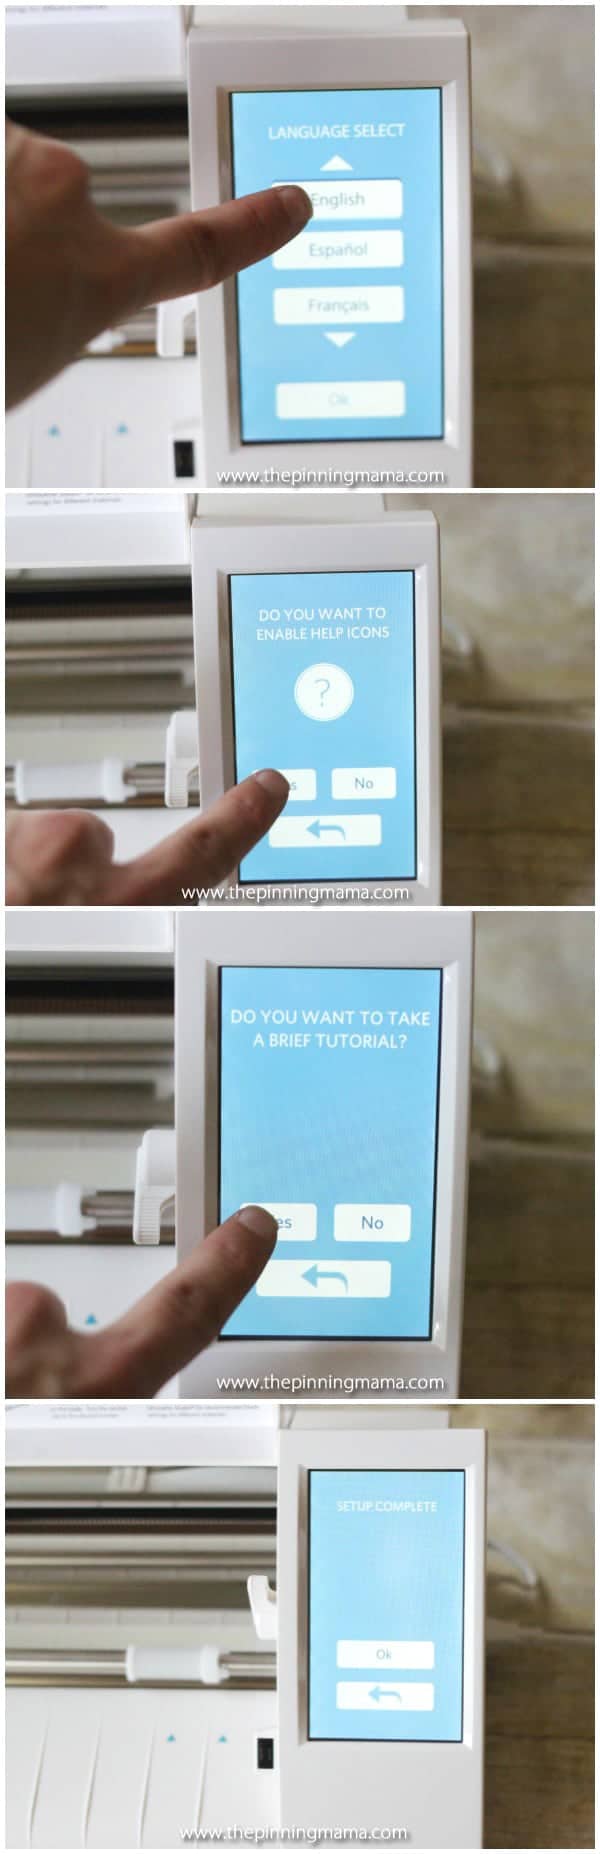
- Turn on your machine. You will find the power button next to where you plugged in the cords.
- The menu will prompt you through an easy set up!
- Select your language.
- Do you want to enable the help icons. I selected yes. You can always turn them off easily later if you decide you don’t want them on.
- Do you want to take a brief tutorial? If you select yes it will walk you through a few functions and features, if you hit NO it will take you to the set up complete screen.
And that is it! Pretty simple, huh? Your machine is officially set up and my next post will walk you through making your first cut with info on placing the blade, software basics, etc.
Let me know if you have any questions other than what I have outlined above in the comments so I can add anything else beginners might have questions on or want to know!


Monica says
I just got a cameo 3 for. Christmas… it’s all connected but but when I hit print it tells me to connect —– IT IS CONNECTED ?! Help!
Ruth says
Thank you
Mary C says
Somehow my Cameo 3 got set up to a different language – not English. I have googled and can’t find out how to reset it. Any Clue?
Thanks,
Mary
Gayla says
Can you please show how to update library. Mine gets to 43.5 or 43.8 and then shows there is an error and to click fix error. Then goes back to update library…… I am out of ideas.
Kelli Moauro says
How do I download and install the silhouette software if I have already registered and completed steps to my cameo? Steps 1-3 are complete after several tutorials for running step 3 but I am stuck on step 4 with no luck! Help please
Debi Fraser says
I could not turn the white plactic out of the grooves! Is that usually a problem????
Kimber says
Hi Debi- They are all hard to turn. You really have to get a good grip on them and use some muscle. It may feel like you are pushing too hard, but it is pretty normal.
Debi Fraser says
Thank you! As a farmers daughter….I got the pliers out…rapped the part in towel and by George, that sucker moved! lol
Now for stupid answer #2…..I downloaded some free clips and how do I put them where I need them….I’m on a Mac
Ron Matney says
I just purchase the new Silhouette Cameo for my wife. I also purchase a new computer to go with it. My question is how does she transfer all the Jpegs, pics, clips she has on her old compute to her new up grade computer.
Kimberly Flores says
What is the AV on AV off setting for on the cameo.
I went through my first cut experience with your instruction, and then read the entire Silouette manual. Where did I miss it?
Kimber says
This is called kearning and has to do with how the text lines up. For example if the V starts where the A ends when you write AV or if it is moved closer together so that it looks more natural since they both have a slant to them. Does that make sense? You can see an example here: https://creativemarket.com/blog/whats-the-difference-between-leading-kerning-and-tracking
Peg says
I was able to get up to here but am unable to download the software!
Peg says
How do you know what “paper” to use? Some stick and I guess that is for glass but which one is the one you iron on?