Step by Step instructions on how to use heat transfer to create t-shirts and custom projects with tips and tricks for perfect application.
Read on to hear what I have learned along the way on Heat Transfer Vinyl, but first, let me make sure you know about my Silhouette 101 series! I have been putting together all of my most asked questions, and favorite tips and tricks I have learned along the way in this series! You can see all of the posts here on the Silhouette 101 page. Now before we start, make sure to do two important things:
- Sign up for my Crafty Newsletter! This will deliver all crafting posts including each new Silhouette 101 tutorial right to your inbox as they are released, so you don’t miss a thing! Sign up here!!
- Pin the Silhouette 101 page to your Silhouette or craft board on Pinterest (and make sure to follow me while you are there!) Now, if you are crafting and have questions, you have an easy place to find this post and a place to reference for all of your questions! You can repin the Silhouette 101 pin here!
I remember in the 80’s my mom making me t-shirt dresses. I loved them! When I was really lucky she would also buy these cool designs at the store that she could just iron on so I could rock my metallic butterflies and horses right on the front of the dress. Well… that fad came and went, but what is still pretty darn awesome is being able to customize any project you make with fabric. We have come a long way since the 80’s, and with my Silhouette Cameo I am now able to use Heat Transfer to cut any design, monogram, team logo, party design, etc. and add it to the front of a shirt, a bag, a pillow, or pretty much anything that can be ironed.
This has actually become one of my favorite uses for my Cameo and I have quite the collection of projects I have created with it. It is pretty easy to do, however there were a few tips I picked up along the way I am going to share with you so you can skip the learning curve I went though and make your projects perfect from try 1! Just consider this The Beginners Guide to Heat Transfer Projects! Oh and if you think this is pretty much the coolest thing ever {like me} make sure and scroll past the tutorial for an awesome sale on all Heat Transfer Materials and Silhouette Cameo and Silhouette Portrait Machine Bundles with promo code PINNING.
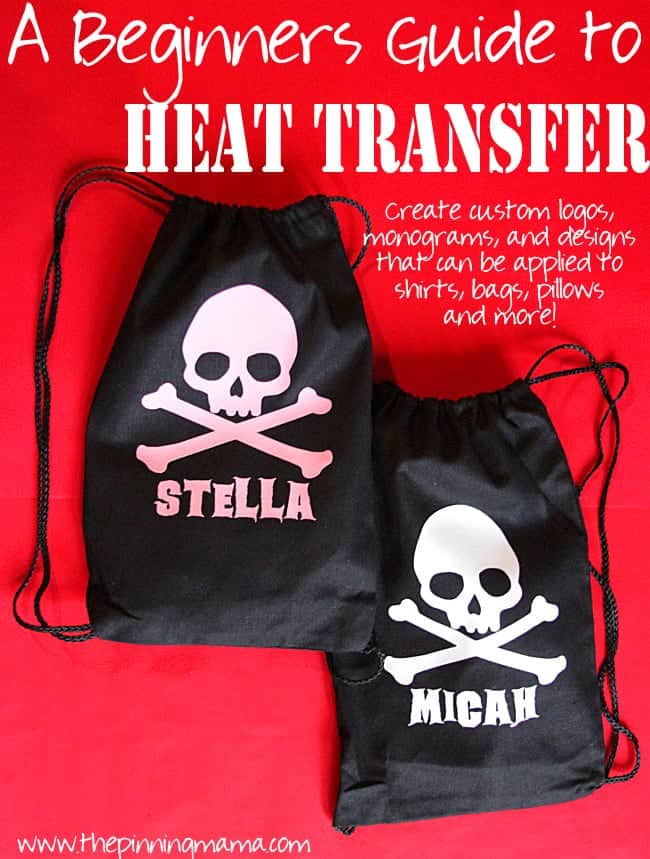
So for simplicities sake, we will just walk though this project and talk step by step how you would make it, with all the tips and tricks you really want to know as they apply along the way. These are the party favor bags I made for my son’s pirate themed birthday party. You can see the details on where I ordered them and all the goodies I filled them with here. So let’s just start with tip number one.
1. What can I use heat transfer on? Anything you can iron on with a very HOT iron. When picking out these backpacks I found many options made out of synthetic material but I was afraid that the hot iron would melt it, so I went with canvas. The heat transfer will be ironed on with one of the irons hottest settings so make sure your fabric can withstand that heat. It is also helpful to PRE-WASH your project if it is something that will be washed. I found that if you don’t prewash, then the shirt (or project) can pull a little from shrinking around the heat transfer material if it is washed for the first time after the heat transfer is applied. If it isn’t something you will be washing (like these backpacks) no need to worry about this step!
2. What kinds of heat transfer material are available?
Silhouette Brand Heat Transfer Material: You can get heat transfer in MANY types of styles and finishes. There is smooth heat transfer which comes in matte, glossy, and even glitter. You can also get flocked heat transfer which has a thin coat of flocking making the front soft and fuzzy. Lastly, you can get printable heat transfer for dark fabrics or light fabrics, that allows you to print your own designs, cut them out and transfer them on your project. This is perfect for really intricate designs with lots of colors!
Other Heat Transfer Vinyl Options: There are many other options beyond just Silhouette Brand for Heat Transfer vinyl. Many people love Siser Easyweed HTV (Heat Transfer Vinyl.) They have starter packs as well as a really wide variety of options when it comes to colors. They also sell glitter HTV which I love for projects for my daughter! You can find lots of other really awesome specialty types like patterned heat transfer, gold metallic heat transfer, and reflective heat transfer to name a few!
IMPORTANT: If you are not ordering Silhouette brand vinyl, make sure (check and double check!!) that you are ordering no larger than a 12″ width (length can be longer) or else you will have to cut it down before you use it in your machine which is kind of a pain.
From my experience, the flocked heat transfer is the most forgiving and dummy-proof! It is the easiest to apply, without ironing too much and burning or shriveling. If you have your heart set on something else, by all means do it! None of them are hard to use and these tips should walk you through it all! Also, if you want multiple colors you can layer different colors of smooth vinyl by applying them one at a time.
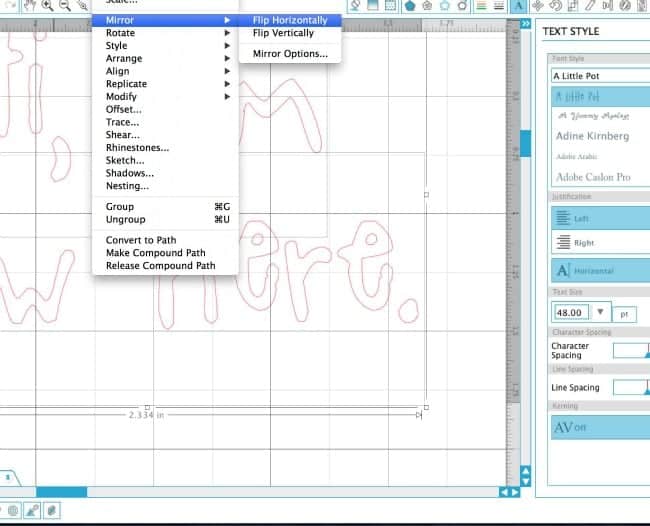
3. How do I create my design? If you are using a Silhouette Cameo or Silhouette Portrait, you will create your design in the Silhouette Studio Software. This is a free download that is available to play with even if you don’t have a machine yet, so even if you don’t have a machine yet feel free to play around and start creating designs! You can use images from the Silhouette Store or create your own one of a kind design. The most important tip to note here is that once you finish your design, you need to flip it into a mirror image. Because the design is flipped when you iron it on, it will ONLY come out facing the right way if you flip the image before you cut it. To do this:
Once you have your design created, select all design components.
Object
— Mirror
——–Flip Horizontally
4. How to cut your heat transfer. Once you have your design finished and flipped you are ready to cut. There are two ways to cut the heat transfer- with or without the cutting mat. I have found that if your design is small enough to fit on your cutting mat, that it is my preferred way to cut it. It just seems more secure and like there is less margin for error. However, if you are creating large designs or cutting multiple images in a row like I was for these party bags, you can cut the heat transfer from the roll without the cutting mat.
You will want to load your heat transfer material into the machine with the clear plastic backing facing down. The backing of heat transfer material will be facing up.
Start with the default cut settings for the type of heat transfer you are cutting and do a test cut. You should be able to see the cut on the heat transfer side, however, you might not be able to see the cuts if you turn the material over and look through the clear side. This is okay! Heat transfer material is VERY thin and the cuts will be very fine. I actually spent quite a long time on the phone with Silhouette because I was concerned it wan’t cutting through when the whole time it was cutting perfectly! Save time and learn from my mistakes!
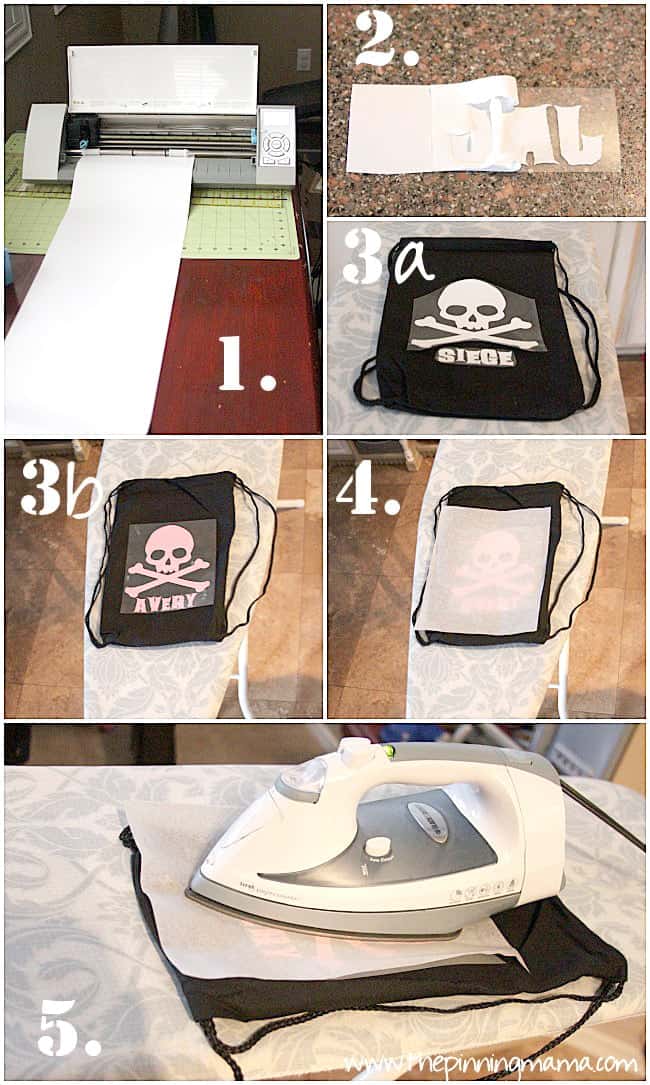
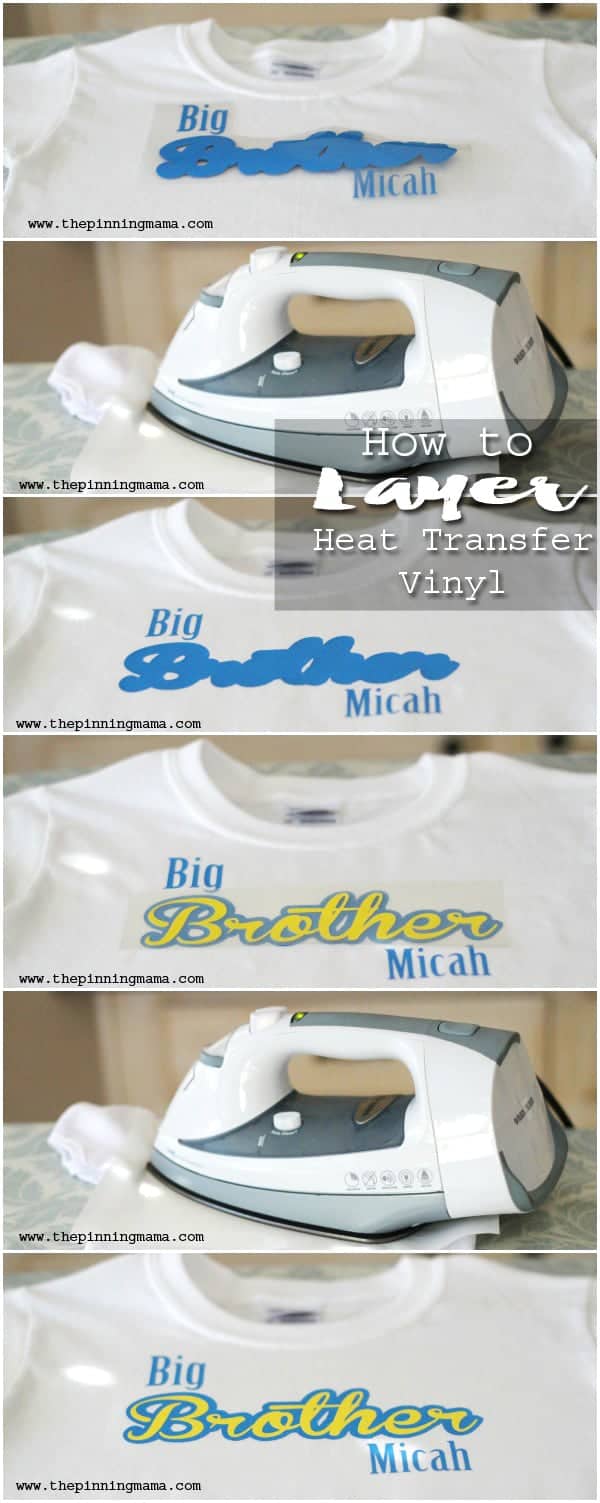
5. Weeding your heat transfer. Once your design is cut, you can trim around the design if there is extra around the edges like you can see in picture 2. Then you will want to peel off any parts of the design that you don’t want to be ironed on, or the negative space. You can use a weeding tool for this, or just use a safety pin. Make sure and get inside of any letters like A and O! When you are done you should have the design you want to transfer left stuck to the clear backing.
6. Arranging the design. We are getting closer! Take the weeded pieces of your design and place them clear backing side up on your project so they are aligned just as you want them. Since the clear backing is now facing up, your design should show just as it will be when it is finished, you should no longer be looking at a mirror image. If you designed and cut all of the pieces spaced just as you want them you should be able to place the the design on as one piece as in picture 3b. However if you compacted the elements of the design to save space while cutting, like I usually do, you can cut out the separate pieces and place them where you want them, like in 3b. The most important thing here is to make sure you have trimmed the clear backing pretty closely so that none of it ends up underneath other parts of the heat transfer.
7. Ironing the design on. Last but not least we get to iron! Read the directions on the back of your specific heat transfer, but most direct you to place your iron on a very hot setting. Mine also directed me to use a towel between the heat transfer and the iron. I found that this did not work as well as using a piece of parchment paper. I tried thin towels and thicker towels and no matter what the parchment just worked better.
Now you will want to put your hot iron on the design for between 10-40 seconds depending on the type, again read the directions for your specific heat transfer. Make sure that you are covering all of the edges of the design with the iron. You can release it and carefully pull up the backing to see if the design has stuck or needs to be heated more. I also found that on designs larger than the iron, it was easiest to iron the design in sections rather than going back and forth across the entire design.
Once the design has transferred I like to let it cool for about 30-45 seconds and then gently peel back the clear plastic until it is completely removed. I find that letting it cool for just a short bit helps because on smooth vinyl, if it gets too hot it can pull a little bit when you are removing the backing and cause wrinkles in the vinyl. Cooling a little seems to prevent this.
I tried to be very detailed and all inclusive in this tutorial beyond the basics of using the machine. I know when I was working on my first project with heat transfer I have a lot of simple questions that were usually grazed over in the tutorials I found online. If you are working on a heat transfer project and have a question I didn’t cover, please feel free to leave me a question in the comments! I would love to help!
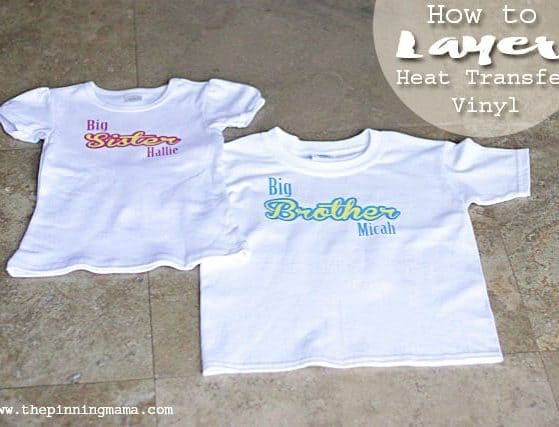
Here is another tutorial on how to layer Heat Transfer Vinyl for a fun multicolored look!
Make sure and check out my other posts to learn more and be inspired!! ——–> You can see more Silhouette projects and tutorials here.


Donna says
Thank you so much….I had tried and tried to do this and it was easy with your help 🙂 Put a new great nephew’s name on an outfit.
Ellie says
THANK YOU!
I had great success with the first project I made using the heat transfer material and then ran into problems on the following two projects (tonight was the second failed attempt). I too have found that a towel, sheet or other type of fabric I have put in-between the iron and the t-shirt has been far to thick to transfer the image. BUT when I turned up my iron to see if that would work, it melted the image & protective sheet. So I am going to go try the parchment paper suggestion and see what happens! I’m just bummed as I’ve gone through almost 2 rolls of the material (which is $15 for 3 feet) and a couple T-shirts trying to find the perfect solution. So thank you for taking the time to write such detailed instructions!
Lesley says
I am trying to figure out how to layer two colors of htv using words. They design comes out nice in Silhouette designer studio but when I apply to my shirts it doesnt line up perfectly and suggestions how to full proof layering htv? Thanks, you are such a big help!!!
Becky says
I’m new to heat transfer. I have a question about cutting the design. I tried with the cutting mat and my design stuck to the mat. I tried without the mat and the material ,moved around in the machine. Any tips? Thanks for the guide; it is very helpful.
Kimber says
How is your design sticking to the cutting mat? The clear plastic side should be toward the sticky side. You shouldn’t be cutting all the way through that plastic so it should lift off in one piece. Check your blade and cut settings to make sure they are right for heat transfer. Also if you are going to cut without the mat make sure you move in the rollers so that the right one is on the right edge of the heat transfer and the left side is under the roller that is all the way to the left. Also make sure that when you raise the bar to move the roller you remember to lower it back down.
Becky says
Thank you. My settings were wrong; I’m just learning. Thank for your quick response!
Barbara says
How so you get the transfers on glass and walls and different things besides clothes
Kimber says
Hi Barbara. There are many different mediums you can use but most likely what you are seeing on walls is vinyl and acts much like a sticker with adhesive on the back.
Jessica says
I am new to the silhouette cameo world. I want to do some designs for shirts. Can I cut out what I want on vinyl and then use heat transfer paper? I ordered some heat transfer paper and it hasn’t arrived just yet. Do I need something else to make a design? Thanks for your help! Jessica
Joan says
I was using the Avery iron on fabric transfer. After one wash , the color fades away. Are a iron transfers like that? What if I get the fabric vinyl? How does that work? And what is the main difference between iron on transfer and fabric vinyl?
Lori Griswold says
Can you use any kind of heating vinyl or does it need to be silhouette brand?
Thanks
Kimber says
You can use any heat transfer vinyl although the quality can vary so be sure to use a reputable brand
Nicole says
Do you know of any other reputable brands?
Amanda says
Siser EasyWeed is my favorite brand!
Tammy Clark says
Thanks. Ni ahve never used yet and can’t wait to try. Have been using cricut for 7 years and have never even turned on my Cameo. Will need try. Ty
kelley lollis says
Can you do this on burlap?