If you are new to owning your Silhouette CAMEO or Protrait and want to work with vinyl, learning how to use transfer tape is the first step!

When you get your first Silhouette machine, it can be overwhelming. That might even be an understatement. There is so much to learn and so much new terminology to wrap your head around. It doesn’t take long before it is all second nature so it is easy to forget what it was like as a newbie.
A few months back my friend Dawn from By Dawn Nicole and I started a Facebook group just for support with your Silhouette machine and to get some crazy awesome inspiration from 20,000 of your new best crafting friends. {If you want to get inspired, request to join here!} Being in the group has reminded me how steep that learning curve in when you start. So I decided to do a Silhouette 101 series where I talk about all the basic things you need to know when you start. So make sure to pin this post for reference to your Silhouette Pinterest board and then come back often to learn more.
What the basic idea of what we are doing here is taking a vinyl cut and using a sheet of transfer paper, also called transfer tape, to pick up the design and move it perfectly to the surface that you want to adhere it to. The reason you want to use transfer tape is that even though vinyl looks just like a sticker, it isn’t as stiff as a sticker. This makes it nearly impossible to peel it up and place it down in exactly the way that it was designed. It gets even harder when the design is big or intricate. And then there is the whole issue of lining everything up just perfectly as you designed and cut it. It would be almost impossible to do by hand.
Using transfer tape you can pick up the whole design at once and TRANSFER it over to your project.
Now that makes sense, right?!
Using transfer paper might sound a bit scary, but it is really super simple. If you don’t have your transfer paper yet, you can grab transfer paper from Silhouette here or on Amazon here . There are two main kinds of paper, clear and translucent. I wouldn’t say one works better than the other, but it is more a matter of preference. Although I am using the clear in this tutorial, I tend to prefer the translucent because it has grid lines that I think make it easier to keep your projects perfectly aligned.
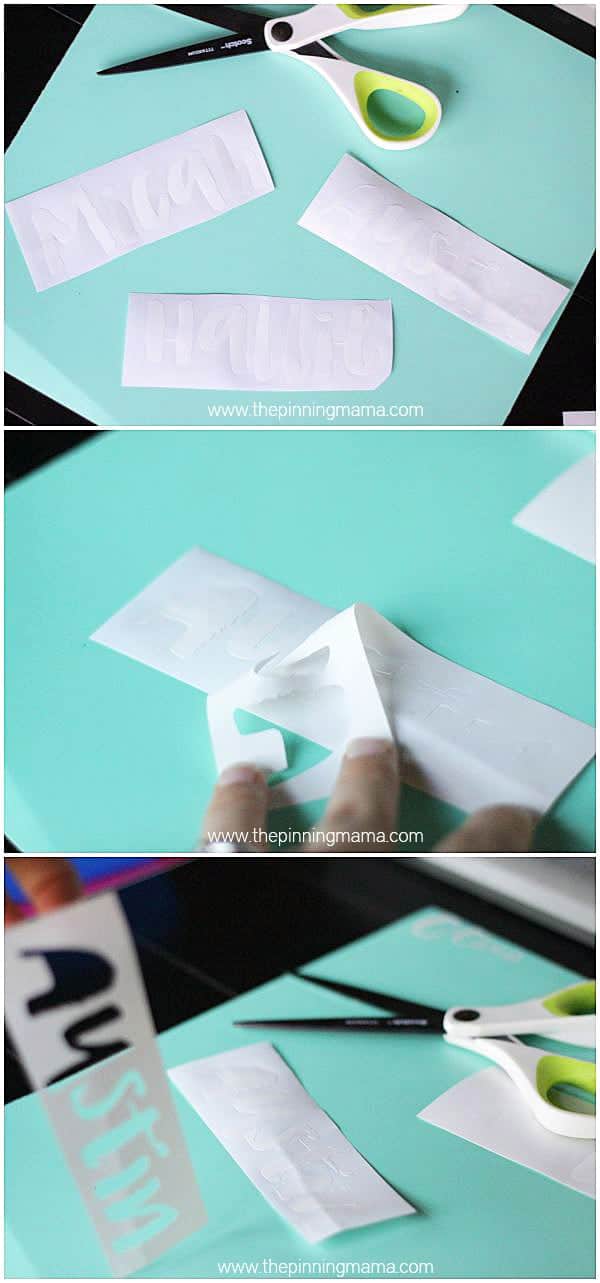
The first thing we are going to do is to weed the design. All weed means is that we are going to peel off all of the pieces of the design that we aren’t using and get rid of them. You can use a Silhouette hook tool to make the job super easy.
You can see in the picture above, I am trying to put the names I cut in vinyl onto the water bottles in the top picture. So in this case I weeded all of the excess vinyl, leaving the letters and the dot of the i. If I was making a stencil I would have done the opposite, by taking out the letters and leaving the excess to use as a stencil. One list tip: I like to cut down the pieces of vinyl closely around the area I want to make weeding easier.
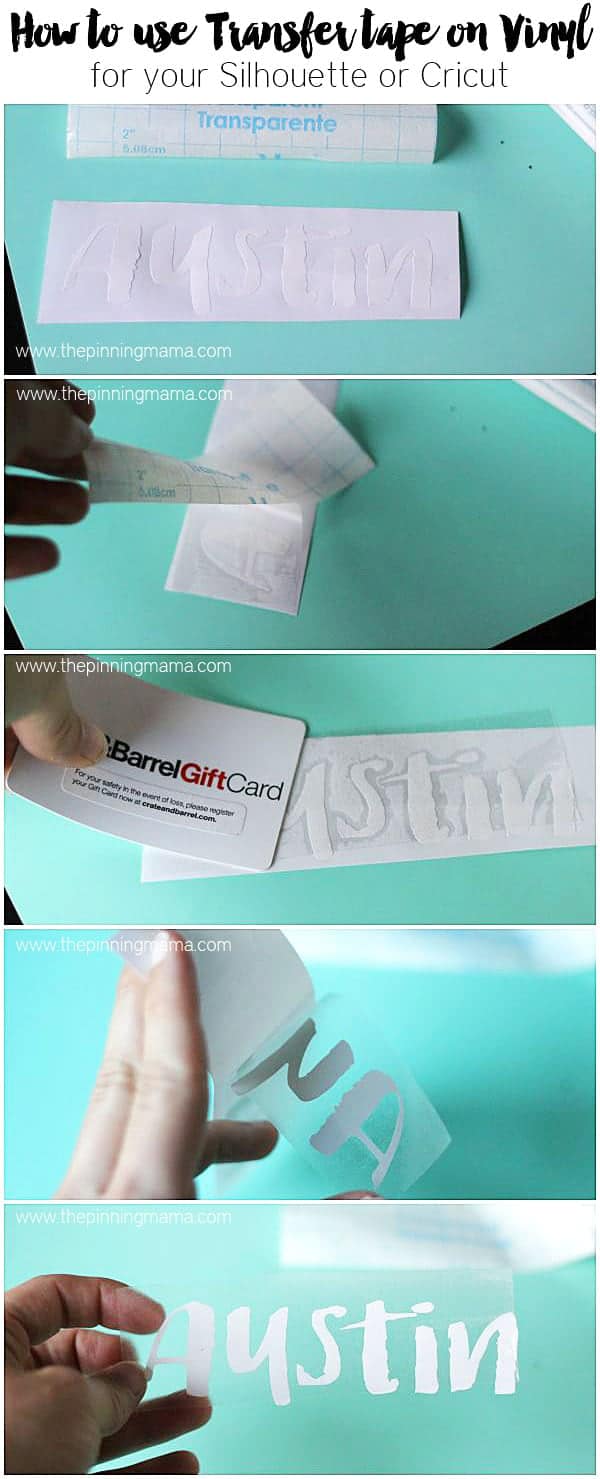
Next you will want to cut your transfer paper roughly the same size as your piece of vinyl. Start to peel off the backing and line up and stick that edge to your vinyl design as shown in the picture above. You can then peel the backing off and stick down the rest of the transfer paper sticking it down as you peel. You could just peel the whole thing and stick it down, but I tend to get a lot of bubbles when I do that so this method works about 100x better for me!
Once you have the transfer tape on use a scraper tool, or an old gift card to scrape over the design to make sure the transfer tape is adhering to the vinyl nice and tight. Then slowly start to peel up your transfer tape at any corner. As you peel, the vinyl should come off the backing with the transfer tape. Sometimes it can get a little stubborn and in that case I just use my fingernail to coax the edge of the vinyl piece up and it usually pops right up to the tape and you can keep peeling.
Once you are done you should have the entire design you hope to transfer on the transfer tape and off of the backing. Make sure to pay extra close attention to dots on i’s and periods and other small punctuations. They can be tricky and are easy to miss!
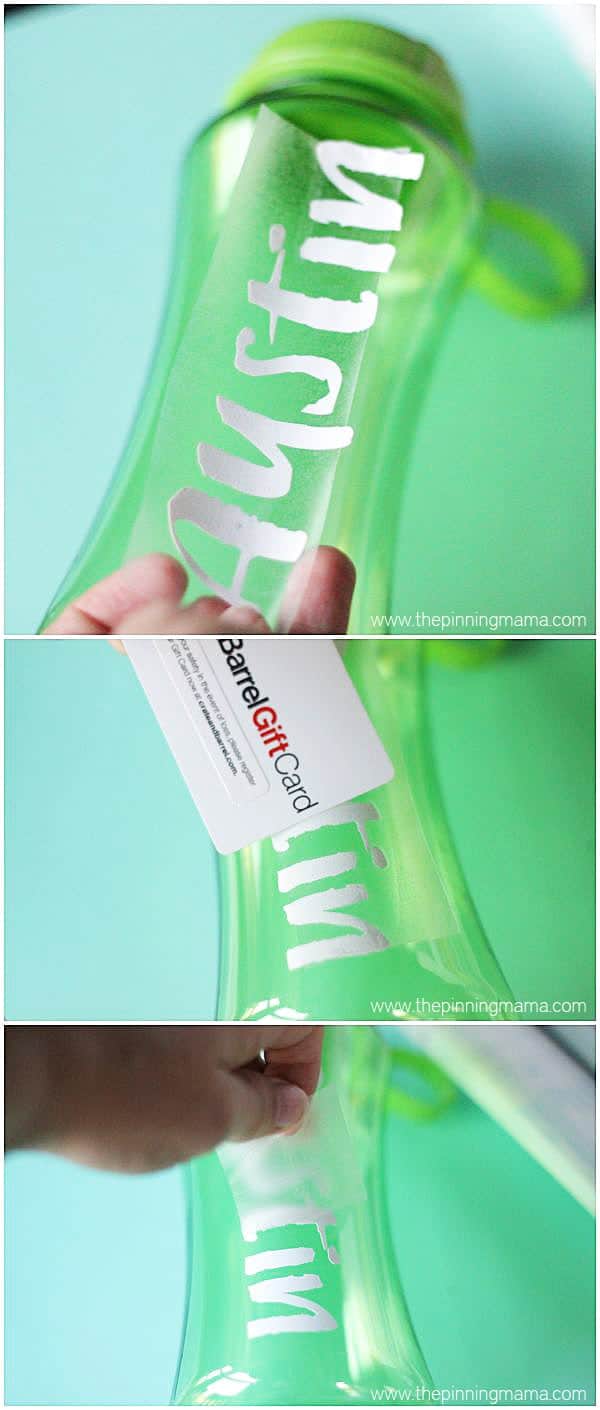
The only thing left to do now is apply your design to your project. Line up your design on your project and press the transfer tape firmly down. Then get out your scraper tool again and score over the whole design to make sure that it adheres to the water bottle evenly and securely.
Then start at any corner and peel back the transfer tape taking special care not to pull up any of the letters or small characters. Peel it back slowly until you reach the end and there you have it! You just transferred your first vinyl design easy as that!
If you love learning all about how to use your Silhouette machine I have a few more posts you just might love!
50 Tips and Tricks for your Silhouette – You can thank me later!


Stephanie says
Love the idea and would LOVE to be added to the FaceBook group for Silhouette!
Kimber says
Hi Stephanie! Just click the link to the group in the post and request to join and we will approve it! Thanks!
Stephanie says
I can’t find the link? It says request to join here, but I can’t click on it.
Vicky B. says
Thank your for sharing this tutorial. 😀 I just got a Cricut and I am planning on working with vinyl, so this tutorial (even though it’s for the Silhouette) is helpful. I did want to ask, have you used vinyl on cups and glasses, and if yes, have you had any problems with the vinyl staying on when you wash the cups/glasses by hand or in the dishwasher?
Ashley says
I just got my Silhouette Cameo on Monday and have been looking like a deer in headlights!
Madison says
Where did you get your Font that you are using in this tutorial?
Sara says
Can you please tell me which font this is you’re using?
Kimber says
It is called brushed and you can find it here: http://crtv.mk/u4HE
Keshia Cousins says
Can someone add me to the Facebook group please. Keshia Cousins
babs says
I’m super frustrated with vinyl – it’s sticking more to the transfer tape than to the wall! Anyone have any suggestions that can help me?
Kimber says
You are so right! It can be frustrating sometimes!! I think it is really helpful to do a couple of things-
1. Make sure you score it well before you try to remove
2. The thinner your design is, the harder it will be and the slower you will need to go.
3. After you stick to the surface, start peeling from one corner and when you get to where the vinyl is go very slowly. You can use a spatula tool or your fingernail to pull down the corner of the vinyl if it is not sticking the the wall. Then continue to hold it while you slowly pull up the rest. It will help the rest stay where it should when you get the first corner down.
Chastity R Corbett says
Thank you so much! I just got my Cameo 2 and I destroyed the mat the first day I got it. I peeled the adhesive off the vinyl and stuck it on the sticky side of the mat. I couldn’t get the vinyl off. Needless to say I bought a new mat yesterday. Yes, I just got my Cameo on Good Friday. LOL the videos I tried watching weren’t detailed enough with the instructions. You’re my hero! Thank you! I have to find instructions for using multiple colors on heat transfer and the regular vinyl can’t be used for heat transfer right? I’m a novice. I will be a Pro soon thanks to you! What is the name of the FB group because the link is not working.
Toni says
Oh I hope you can help me! I just recently got my Cameo, and am so excited to create things with both vinyl and paper. But, I’m on the verge of tossing it out the window! I’ve used the vinyl that came in my starter bundle – Silhouette brand – and it was a pain in the rear to weed, but adhered to the transfer tape beautifully. So I tried Oracal vinyl (after several friends suggested it), and it weeded like a charm! But it takes two people and about 20 minutes to get it to adhere to the transfer paper. Please help! I have so many ideas, but I don’t want to spend hours doing what others accomplish in minutes! PS – It does this with both thin and thick fonts, small and large.