If you are new to owning your Silhouette CAMEO or Protrait and want to work with vinyl, learning how to use transfer tape is the first step!

When you get your first Silhouette machine, it can be overwhelming. That might even be an understatement. There is so much to learn and so much new terminology to wrap your head around. It doesn’t take long before it is all second nature so it is easy to forget what it was like as a newbie.
A few months back my friend Dawn from By Dawn Nicole and I started a Facebook group just for support with your Silhouette machine and to get some crazy awesome inspiration from 20,000 of your new best crafting friends. {If you want to get inspired, request to join here!} Being in the group has reminded me how steep that learning curve in when you start. So I decided to do a Silhouette 101 series where I talk about all the basic things you need to know when you start. So make sure to pin this post for reference to your Silhouette Pinterest board and then come back often to learn more.
What the basic idea of what we are doing here is taking a vinyl cut and using a sheet of transfer paper, also called transfer tape, to pick up the design and move it perfectly to the surface that you want to adhere it to. The reason you want to use transfer tape is that even though vinyl looks just like a sticker, it isn’t as stiff as a sticker. This makes it nearly impossible to peel it up and place it down in exactly the way that it was designed. It gets even harder when the design is big or intricate. And then there is the whole issue of lining everything up just perfectly as you designed and cut it. It would be almost impossible to do by hand.
Using transfer tape you can pick up the whole design at once and TRANSFER it over to your project.
Now that makes sense, right?!
Using transfer paper might sound a bit scary, but it is really super simple. If you don’t have your transfer paper yet, you can grab transfer paper from Silhouette here or on Amazon here . There are two main kinds of paper, clear and translucent. I wouldn’t say one works better than the other, but it is more a matter of preference. Although I am using the clear in this tutorial, I tend to prefer the translucent because it has grid lines that I think make it easier to keep your projects perfectly aligned.
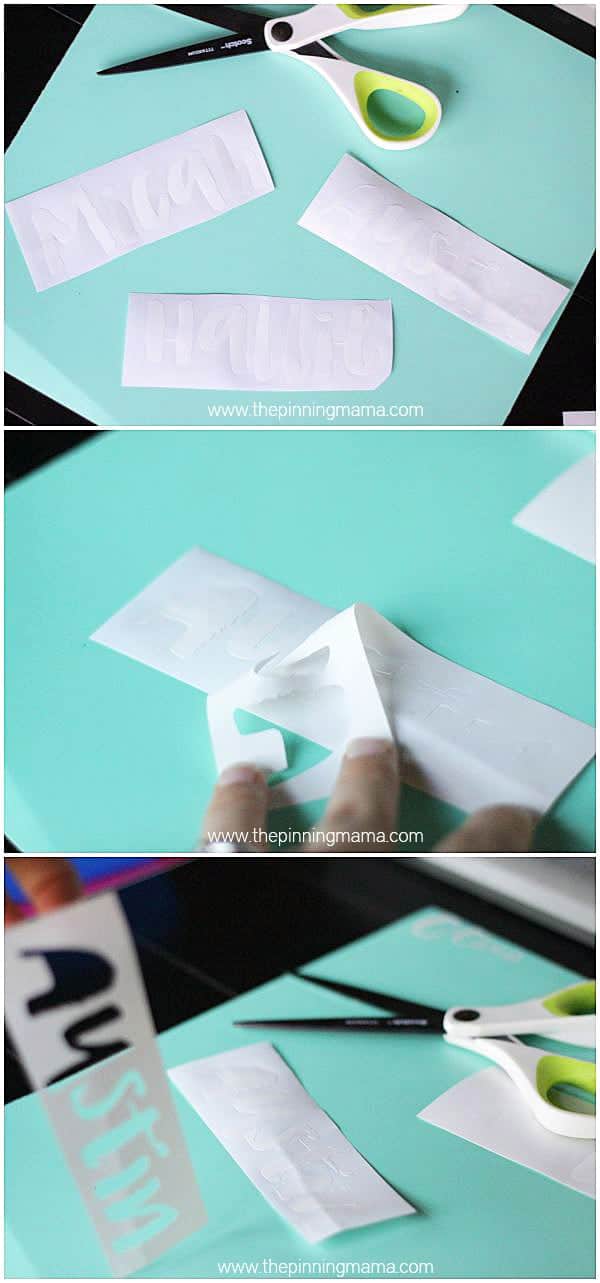
The first thing we are going to do is to weed the design. All weed means is that we are going to peel off all of the pieces of the design that we aren’t using and get rid of them. You can use a Silhouette hook tool to make the job super easy.
You can see in the picture above, I am trying to put the names I cut in vinyl onto the water bottles in the top picture. So in this case I weeded all of the excess vinyl, leaving the letters and the dot of the i. If I was making a stencil I would have done the opposite, by taking out the letters and leaving the excess to use as a stencil. One list tip: I like to cut down the pieces of vinyl closely around the area I want to make weeding easier.
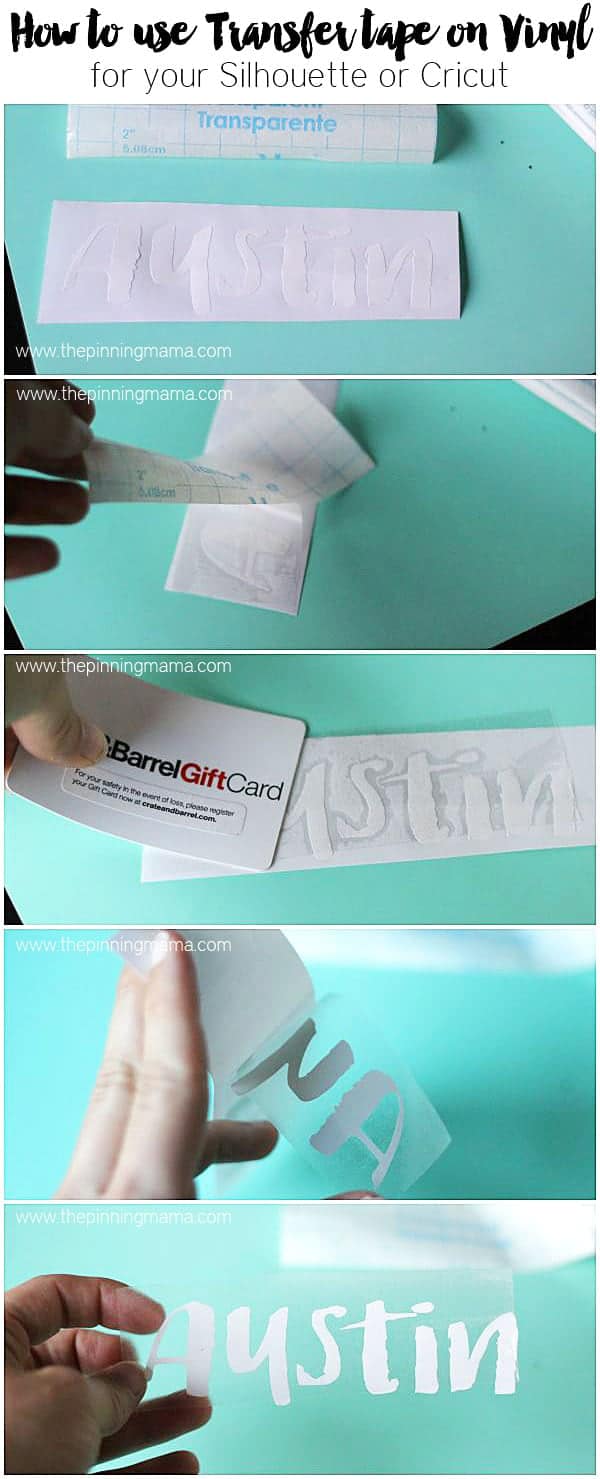
Next you will want to cut your transfer paper roughly the same size as your piece of vinyl. Start to peel off the backing and line up and stick that edge to your vinyl design as shown in the picture above. You can then peel the backing off and stick down the rest of the transfer paper sticking it down as you peel. You could just peel the whole thing and stick it down, but I tend to get a lot of bubbles when I do that so this method works about 100x better for me!
Once you have the transfer tape on use a scraper tool, or an old gift card to scrape over the design to make sure the transfer tape is adhering to the vinyl nice and tight. Then slowly start to peel up your transfer tape at any corner. As you peel, the vinyl should come off the backing with the transfer tape. Sometimes it can get a little stubborn and in that case I just use my fingernail to coax the edge of the vinyl piece up and it usually pops right up to the tape and you can keep peeling.
Once you are done you should have the entire design you hope to transfer on the transfer tape and off of the backing. Make sure to pay extra close attention to dots on i’s and periods and other small punctuations. They can be tricky and are easy to miss!
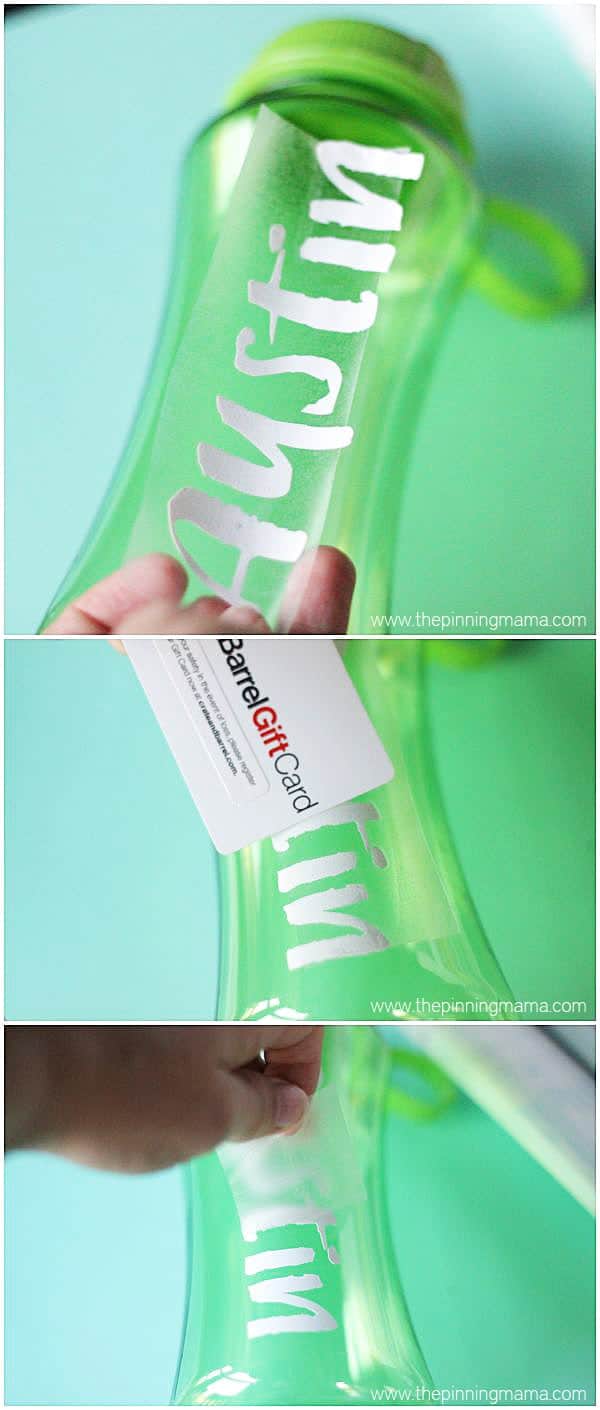
The only thing left to do now is apply your design to your project. Line up your design on your project and press the transfer tape firmly down. Then get out your scraper tool again and score over the whole design to make sure that it adheres to the water bottle evenly and securely.
Then start at any corner and peel back the transfer tape taking special care not to pull up any of the letters or small characters. Peel it back slowly until you reach the end and there you have it! You just transferred your first vinyl design easy as that!
If you love learning all about how to use your Silhouette machine I have a few more posts you just might love!
50 Tips and Tricks for your Silhouette – You can thank me later!


Lenina Curtis says
Would love to be added to the Silhouette Cameo Facebook group.
Kimber says
We would be happy to add you! Please request to join here: https://www.facebook.com/groups/SilhouetteCAMEOProjectInspiration/
Heather says
Hello! For this project, once the decal is on the transfer paper, is the back of the vinyl sticky? If I wanted to mail someone something like what would I do? I am clearly very new! 🙂 I guess you can do a mirror image but then do you put the color vinyl in backwards? Thanks!!
Kimber says
Hi Heather! No problem… I welcome all newbies! We were all there once. When you peel the vinyl off of it’s backing on to the transfer paper it is sticky which is what carries the design over to what you want to apply it on without it getting any wrinkles or distortion. In instances where you don’t want to apply it right away, I recommend applying the transfer tape, peeling the design off and then sticking the whole thing back to the backing from the transfer tape. Hope this helps!
Brighton says
I know I am commenting a year late, but I am looking for some advice on transfer tape and vinyls! My Cricut brand of TT is really struggling pulling up my Cricut brand of glitter vinyl. Can you for someone else give a newbie some help?!
Stacey says
I have the same problem. Unless you use the paper it came with, nothing else seems to work. And they do not give you near enough paper! I typically don’t use cricut brand vinyl, but the glitter was really pretty. Everything else I have tried doesnt work.
Liz says
I can’t get my vinyl to transfer to the contact paper. I have tried a credit card and scrapper and it’s just not sticking. Any ideas? It’s an outdoor vinyl and there are little dots in the design so I need it to stick to transfer it. Thanks
Shelleen Bowman says
I have been trying to use transfer tape with my vinyl and have been unsuccessful in getting the vinyl to stick to the transfer tape. I have used various different settings and made sure I burnished the vinyl well and still no luck. Thanks for any advice you can give me.
Kimber says
Sometimes you have to help the first edge of the vinyl up with your fingernail and once it is on the tape the rest should peel up easily. You might also try a different brand. Each brand has it’s own level of stickiness. Hope that helps.
Sarah says
I was wondering what font you are using to create these water bottle designs with ?
Kimber says
Hi Sarah- It is called Brushed on my font menu, but the name it downloads as is something else and I don’t quite remember. I have tried to look it up before but it is tricky with that name. I hope that helps!
Keith Lewis says
What brand of transfer paper do you recommend for very detailed patterns? Wife having ver difficult time
Cathy Fralish says
Can you tell me what font this is on the water bottles? Thanks!